Once this page is ready, ask Mike to make it public. Looks like it is possible to not be indexed by search engines:
Table of Contents
| Table of Contents |
|---|
Accessing Qualtrics
Everyone with an eCommons account can access Qualtrics. We have set up this guide assuming program administrators will log into Qualtrics to administer their surveys, and applicants, endorsers, and reviewers will not log into Qualtrics.
- Navigate to the eCommons website, https://ecommons.med.harvard.edu/default.asp, and log in.
- Click Applications from the upper left, then click Qualtrics Survey Tool from the list.
Sharing Library messages etc.
To collaborate with other people in your office or at HMS, we suggest that you create a Group. This will allow you to share projects, graphics, files, messages, and contact lists. Groups can include everyone in your organization, everyone in a specific Division, or only specific users that you manually select. Contact the HMS Qualtrics administrator, Tamara Will, at servicenow@hms.harvard.edu to have a Qualtrics group created.
Initial Survey Creation
Bill Murphy and Genoa Polumbo will create the first set of surveys for you. We'll share the finished surveys with you, then you will need to make a copy of each survey. We will delete the originals so you have the only/master copy. This way, you are the owner of the surveys going forward. All custom messages will come from your library, and you will be in control of any future edits. We won't have access to your surveys unless you grant us temporary access to help troubleshoot a problem. The next time you need to run that application cycle, you can copy from your previous year's surveys. We will be available to help, but the intention is that you own your surveys.
Since custom messages don't copy from one survey to another, we won't create custom messages for you. You can create them by going to Survey Options and selecting "Custom end of survey message..." etc. Or, you can create custom messages by clicking Library from the upper right, then Messages Library, and click "+ New Message."
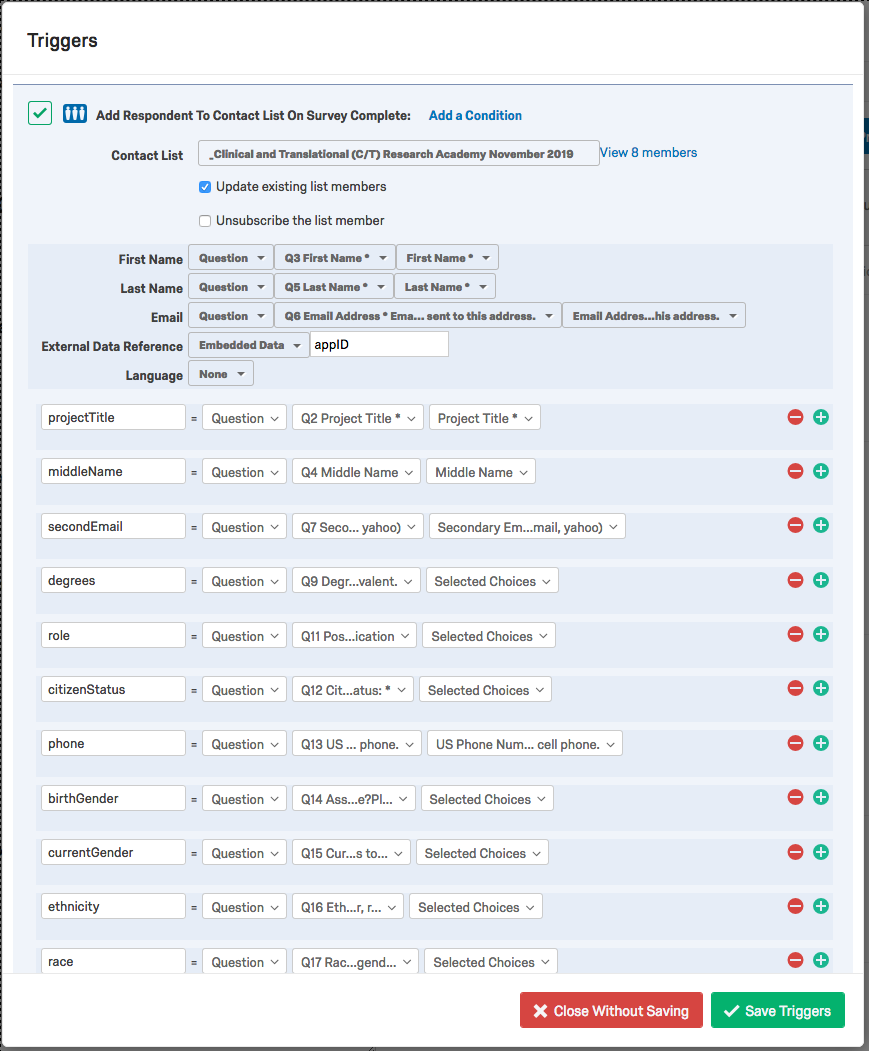
We will add all questions from the application survey to the contact list trigger so you can easily export the contact list trigger to Excel and see the status of endorsements and/or reviews. If you add additional questions to your surveys in the future, remember to add them to the contact list trigger (Tools → Triggers → Contact List Triggers → Click on existing trigger then click Edit to add questions).
Harvard Catalyst Website Integration
If you have a page on the Harvard Catalyst website, you will still need to send in your content updates, including a link to your Qualtrics application survey, and optionally, your RFA and FAQs. Please send these to webupdates@catalyst.harvard.edu at least one week prior to your application cycle opening. Your RFA and FAQ documents can be stored on the HC website, and we can send you the link to them for inclusion in your application survey.
Qualtrics workflow - Application cycles with Post-Application Endorsements
Applications with a Post-Application Endorsement Cycle
Creating a New Unique OC
Create two surveys -- the application and the endorsement. Title them accordingly, e.g., ECR Application 2019, ECR Endorsement 2019.
Applicant survey
...
- Be sure to include questions for Endorser Name and Email.
- Leave Endorser first and last name in one field if you don't need to split them up, for easier piping (importing fields from one place to another).
- You may consider initially only including the survey questions that will be displayed on the endorsement survey or in emails. This will allow you to test the workflow by submitting the forms quickly without having to complete the entire survey. Once the survey is functioning properly, you can add the rest of the survey questions.
...
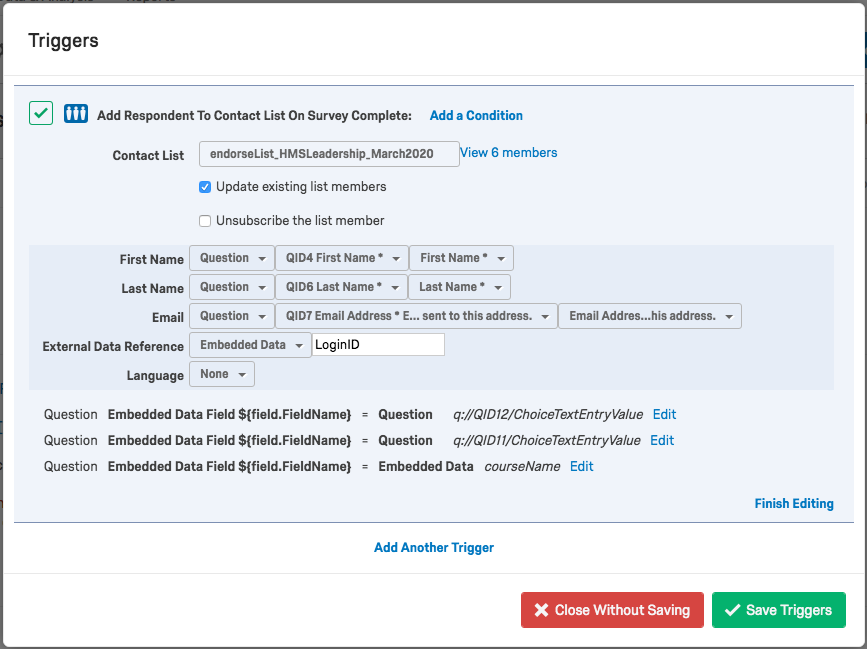
- Tools > Triggers > Contact List Trigger
- Click "Please Select"
- Select My Library:...
- Click New Contact List
Specify unique name based on offering cycle name, e.g. EndorseList_ECR_March2020
(this will reduce possibility of duplication)- Click Save (not Save Triggers, which closes the pop-up)
- Under External Data Reference select Embedded Data and enter "LoginID"
- Populate First Name, Last Name, and Email using the appropriate question from the form (i.e. applicant first, last, email)
- Click "Add additional fields"
- Enter every field from the application survey, in order (Click + to add more fields)
- The field on the left is your variable name, it should be short and not contain spaces
- For open-ended questions select choice should be the question text not "Question Text"
- For multiple choice questions choose "Selected Choices" or "Selected Cho...Entered Text"
- For the file uploads type a memorable name (i.e. adminDoc) and select "File URL"
- Click Save Triggers
- Note: to edit/view existing trigger details, click the name of the trigger, e.g., "Add respondent to the panel..."
- Add email action to send a confirmation email to the applicant when the application survey is submitted.
- Click Actions > Add Action
- Event: Survey Response
- Conditions: N/A
- Tasks: Send Email
- To: from the dropdown, select Survey Question > Email > Email
- You can copy your departmental email address on messages. Separate 'To' emails with a comma. Each recipient will only see their own email address, so it acts as a BCC.
- Add a From Address, From Name, and Reply-To Address
- In the Subject field
- Type "Successful Application of (name of your offering cycle)"
- Add information to the Message field
- Pipe in addressee's name (Hello Jane Doe,...), and course title.
- Pipe in the LoginID so they can reference it if they need to contact you.
- To: from the dropdown, select Survey Question > Email > Email
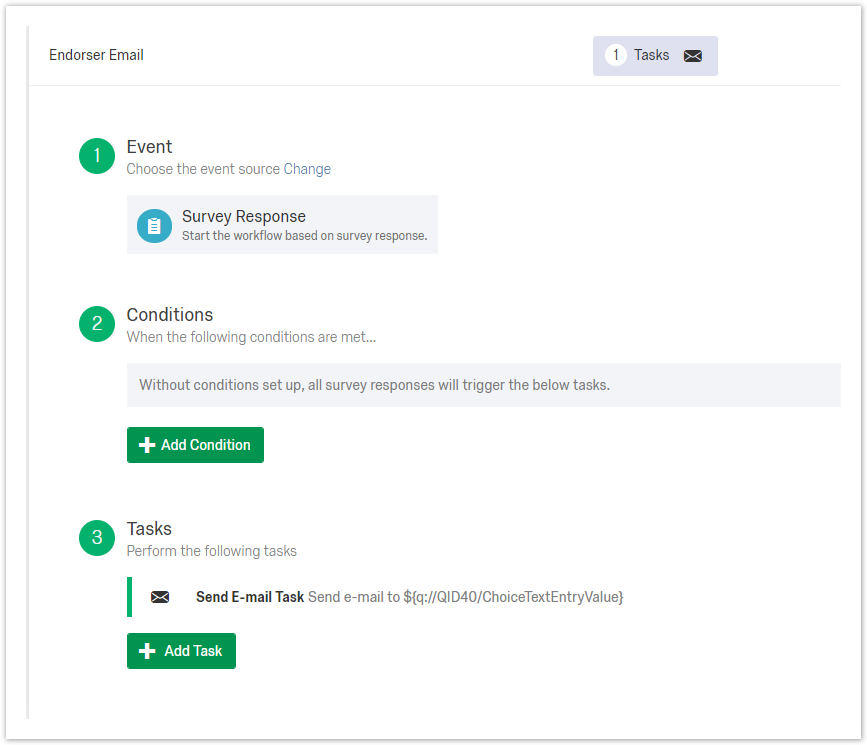
- Add email action to send an email to the endorser when the application survey is submitted.
- Click Actions > Add Action
- Event: Survey Response
- Conditions: N/A
- Tasks: Send Email
- To: from the dropdown, select Survey Question > Endorser Email > Endorser Email
- You can copy your departmental email address on messages. Separate 'To' emails with a comma. Each recipient will only see their own email address, so it acts as a BCC.
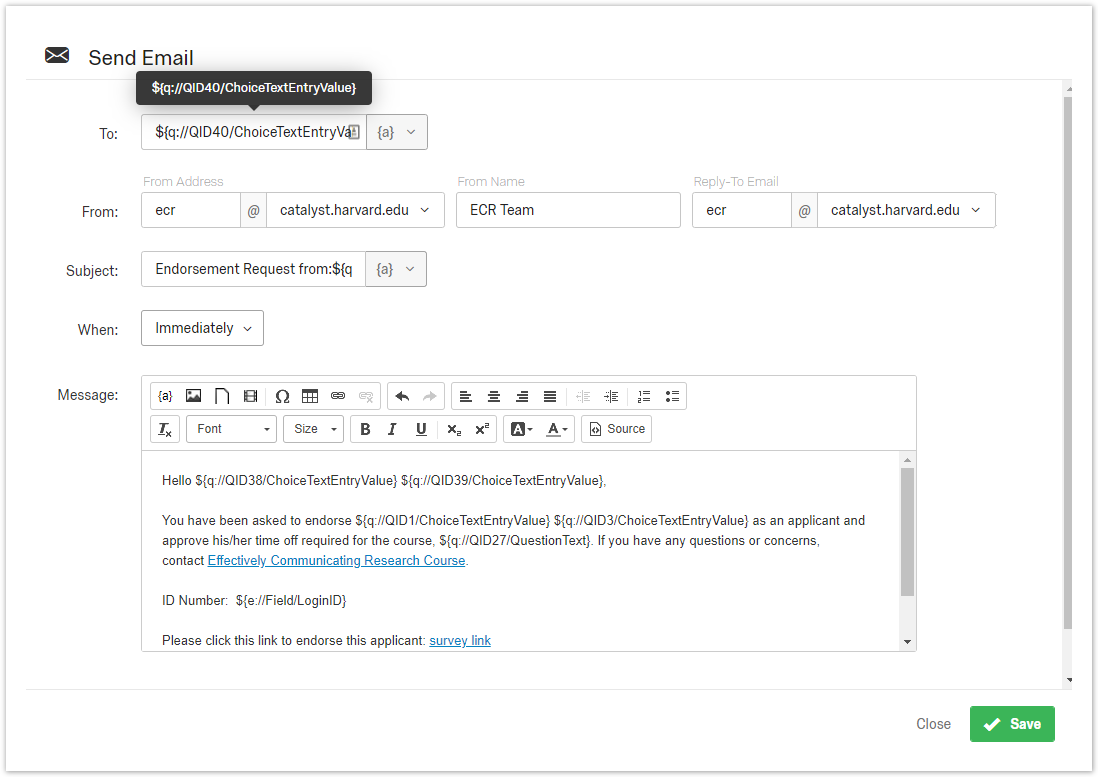
- Add a From Address, From Name, and Reply-To Address
- In the Subject field
- Type "Endorsement request from " (note the space after "request from ")
- From the {a} dropdown select "Survey Question" > First Name, Last Name
- Add instructions to the Message field
- Instructions for the endorsement process
- Pipe in LoginID, applicant first/last, your contact information, etc.
- If you would like to collect the endorser's response using email you are done with the Applicant survey and can begin testing. Make sure to use your own email address when submitting forms to review email templates as well as all surveys and flows.
- To: from the dropdown, select Survey Question > Endorser Email > Endorser Email
OR
- If you would like to collect the endorser's response using a Qualtrics survey, you will need to come back to this email action once you've completed the endorser survey.
Endorser survey (optional; you can alternatively accept endorsements via email)
- Click "Create Project"
- Create questions and add any preferred logic.
- Add a question of type Text/Graphic to display applicant data
- Add instructions to endorser
- Add a placeholder for each field that you want to display (e.g. applicant first and last name)
- Add a question of type Text/Graphic to display applicant data
- Click Survey Flow
- Click Add a New Element Here and select Authenticator
- Authentication Type: Contact
- Authenticate Using Contact: (select "EndorseList-HMSLeadership-March2020" or whatever contact list name you used in the Application survey)
- Authentication Fields: External Data Reference; check "Pre-fill"; type "LoginID"
- Move the Authenticator Block above Question Block
- Click Add a New Data Element Here and click Embedded Data
- Type "LoginID"
- Move above all other blocks
- Click Add a New Data Element Here and click Embedded Data
- Add each element that you want to reference from the Applicant survey (e.g. applicant first and last name)
- Type the field name, i.e. applicantFirst (Make sure the field names match)
- Click Set a Value now
- From the dropdown select Insert Piped Text > Panels Field > Recipient First Name
- Repeat for each field that you want to retrieve from the Contact List (applicantLast, applicantEmail, endorserFirst, endorserLast, etc,)
Other than applicant first name, last name, and email, all other fields will be found under Piped Text > Embedded Data
- Move this block below Authenticator and above the question block
- Click Save Flow
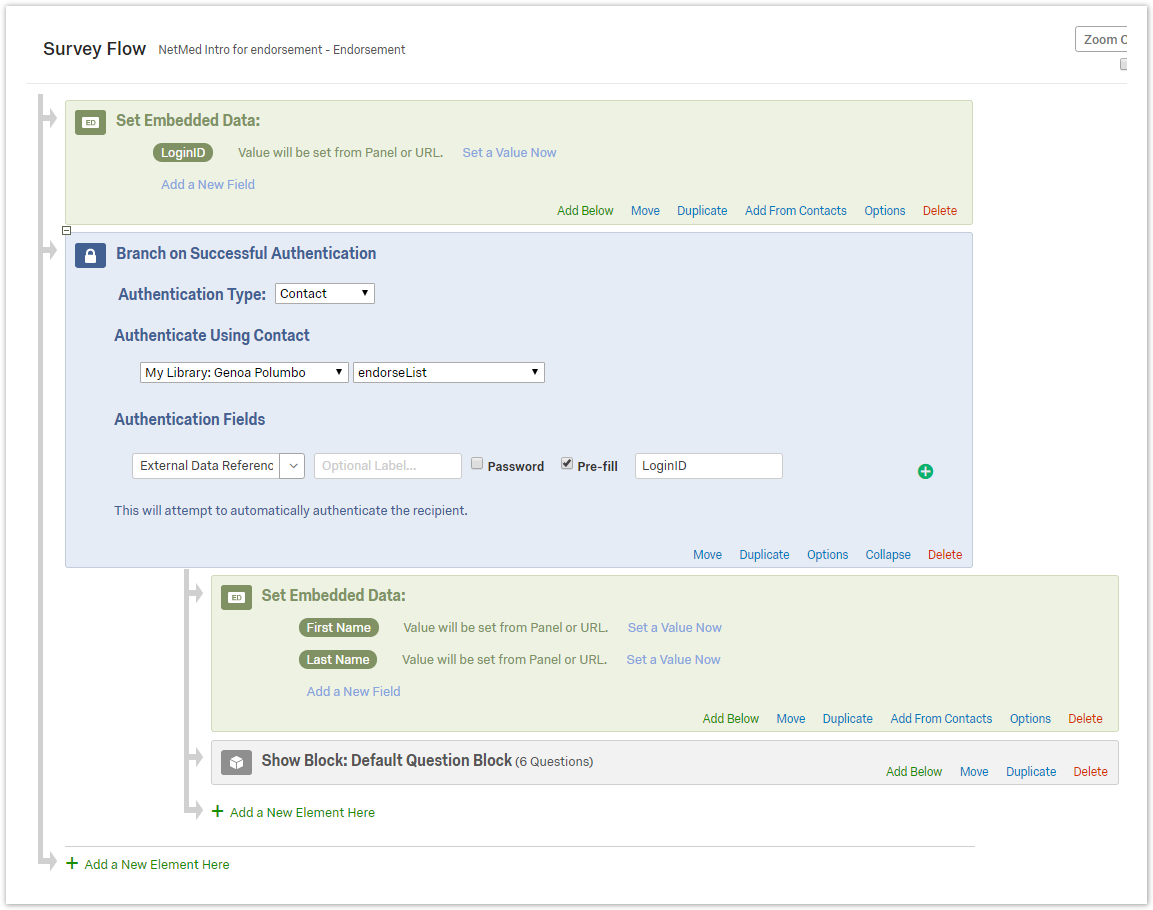
- Add Applicant data to the placeholder questions
- Click the question text to edit
- Select Piped Text > Panels Field > from dropdown, select applicantFirst, applicantLast, etc.
or, Piped Text > Embedded Data for all other fields
- Add a Contact List Trigger to record endorsement
- Tools > Triggers > Contact List Trigger
- Click "Please Select"
- Select My Library:...
Select the same contact list used for the application e.g.EndorseList-HMSLeadership-March2020
- Under External Data Reference select Embedded Data and enter "LoginID"
- Click "Add additional fields"
- For Field Name type "Is_Endorsed"
- Select Question, then select the question that best indicates endorsement
- If it is a checkbox choose "Select Choices Recode"
- Click Save Triggers
- Customize the Endorser email
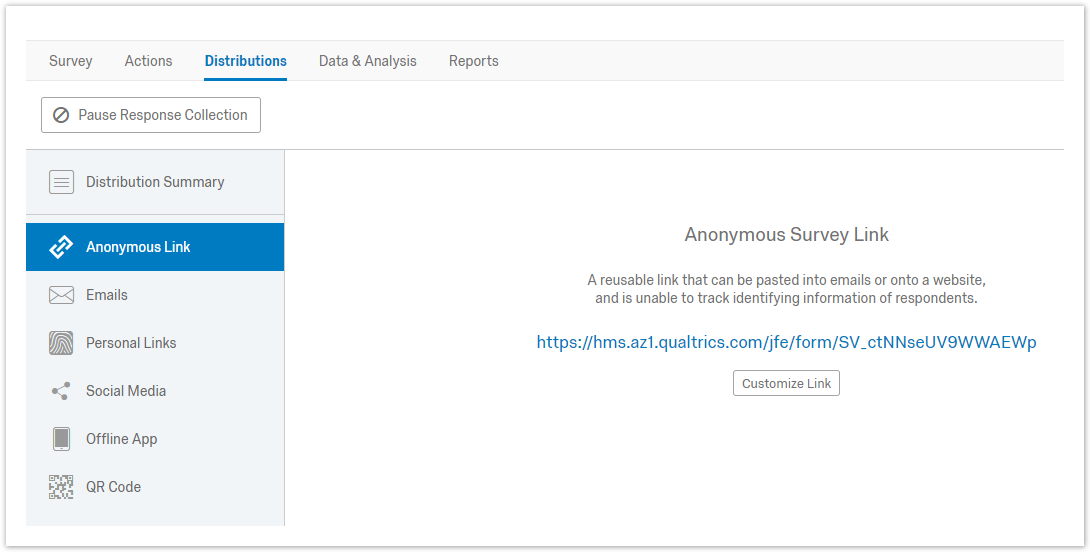
- Copy the Anonymous Link of the Endorser Survey
- Click Distributions
- Click Get Reusable Link (if visible) or click "Anonymous Link"
- Copy the Anonymous Survey Link
- Copy the Anonymous Link of the Endorser Survey
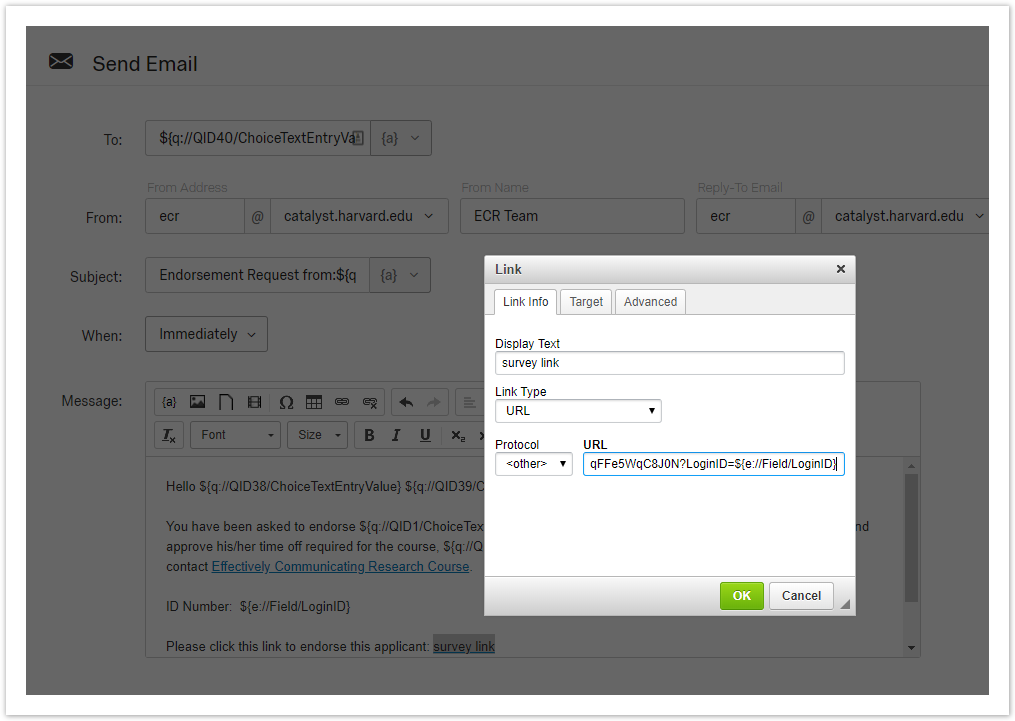
- Paste the Anonymous Link to the Endorser Survey into the Endorser email (within the application survey)
- Append anonymous link URL with ?LoginID=${e://Field/LoginID}
- Be sure to take a look at the Survey Options to make sure it is set up properly (specifically, make sure Open Access is selected)
- You are ready to test. Fill out the applicant survey and include your own email as the endorser. Once you receive the endorsement request email, complete that survey
Copying From a Previous OC
You will be copying the two surveys that best match the current OC (an applicant survey and an endorser survey). Edit the titles as needed.
Applicant survey - copying from previous
Click "Create Project"
- Click "Create From Existing"
- Select Source Project
- Enter a new Project Name
- Click "Create Project"
Edit the questions, logic, etc., as necessary
Click Survey Options > make sure Open Access is selected (review all other settings). This allows anyone to access the application survey.
- Click Save
Edit the Contact List Trigger
You will be using this contact list as a database to store name/value pairs that you can pull from the application survey into the endorser survey.Tools > Triggers > Contact List Trigger
Click "Add respondent to the panel...[NAME OF CONTACT LIST]"
Change to a new Contact List
Click on the name of the existing Contact List
- From My Library, click "New Contact List"
Type the name of your new list (choose a name specific to the current offering cycle)
Click Save (not Save Triggers, which closes the pop-up)
This must be in addition to Save Triggers, which is next.
Click SaveTriggers
- Verify that email Actions have carried over and edit as necessary. If they haven't carried over from the survey you copied, follow the next steps.
Add email action for applicant (confirmation email upon submitting application survey)
Click Actions > Add Action > name the action (eg. Applicant Confirmation Email)
Event: Survey Response
Tasks: Send Email
Use piped text {a} to customize your To, From, Subject, and Message fields.
NOTE: applicant first, last, and email can be found under Piped Text > Panels FieldInclude LoginId in Message so applicant can reference it if they need to contact you.
- Add email action to send an email to the endorser when the application survey is submitted.
- Click Actions > Add Action
- Event: Survey Response
- Conditions: N/A
- Tasks: Send Email
- To: from the dropdown, select Survey Question > Endorser Email > Endorser Email
- You can copy your departmental email address on messages. Separate 'To' emails with a comma. Each recipient will only see their own email address, so it acts as a BCC.
- Add a From Address, From Name, and Reply-To Address
- In the Subject field
- Type "Endorsement request from " (note the space after "request from ")
- To: from the dropdown, select Survey Question > Endorser Email > Endorser Email
- From the {a} dropdown select "Survey Question" > [endorser_name]
- Add instructions to the Message field
- Instructions for the endorsement process
- Pipe in LoginID, applicant first/last, your contact information, etc.
NOTE: applicant first, last, and email can be found under Piped Text > Panels Field
- If you would like to collect the endorser's response using email you are done with the Applicant survey and can begin testing. Make sure to use your own email address when submitting forms to review email templates as well as all surveys and flows.
- Add email action to send an email to the endorser when the application survey is submitted.
OR
- If you would like to collect the endorser's response using a Qualtrics survey, you will need to come back to this email action once you've completed the endorser survey.
Endorser survey - copying from previous (optional; you can alternatively accept endorsements via email)
- Click "Create Project"
- Click "Create From Existing"
- Click "Select a Project"
- Enter a Project Name
- Click "Create Project"
- Edit the questions, logic, etc.
- Click Survey Flow
- If the fields that you are transferring differ from the original applicant survey, you will need to edit the Survey Flow, otherwise no changes are needed
- If the fields that you transferred differ from the original applicant survey you will need to edit some questions
- Click the question text to edit
- Select Piped Text > Embedded Data Field > [field name]
NOTE: applicant first, last, and email can be found under Piped Text > Panels Field
- Customize the Endorser email
- Copy the Anonymous Link of the Endorser Survey
- Click Distributions
- Click Get Reusable Link (if visible)
- Click "Anonymous Link"
- Copy the Anonymous Survey Link
- Copy the Anonymous Link of the Endorser Survey
- Go back to the Applicant survey
- Click "Actions"
- Click to open the endorsement email
- Click "Send E-mail Task" in section 3
- Paste the Anonymous Link of the Endorser Survey into the Message section
- Append with ?LoginID=${e://Field/LoginID}
- Click "Save"
- Click "Create Project"
- Be sure to take a look at the Survey Options to make sure they are set up properly
- You are ready to test. Fill out the applicant survey and include your own email as the endorser. Once you receive the endorsement request email, complete that survey.
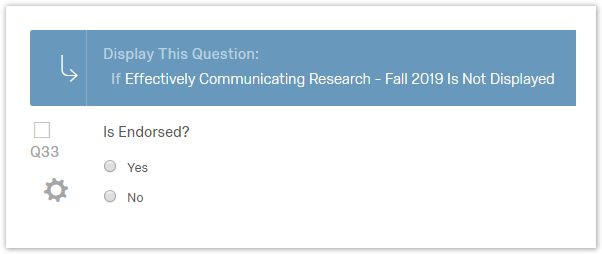
Creating a hidden question that can be used to document status as Endorsed
Add a multiple choice question
Add question text: "Is Endorsed?" or "Endorsed by Primary Endorser?"
Choices: Yes/No
Answers: Single Answer
Actions: Add Display Logic
Choose any existing question that is always displayed and select the condition "is not displayed"
This will ensure that the "Is Endorsed?" question is never displayed on the application survey, but it will display on your dashboard.
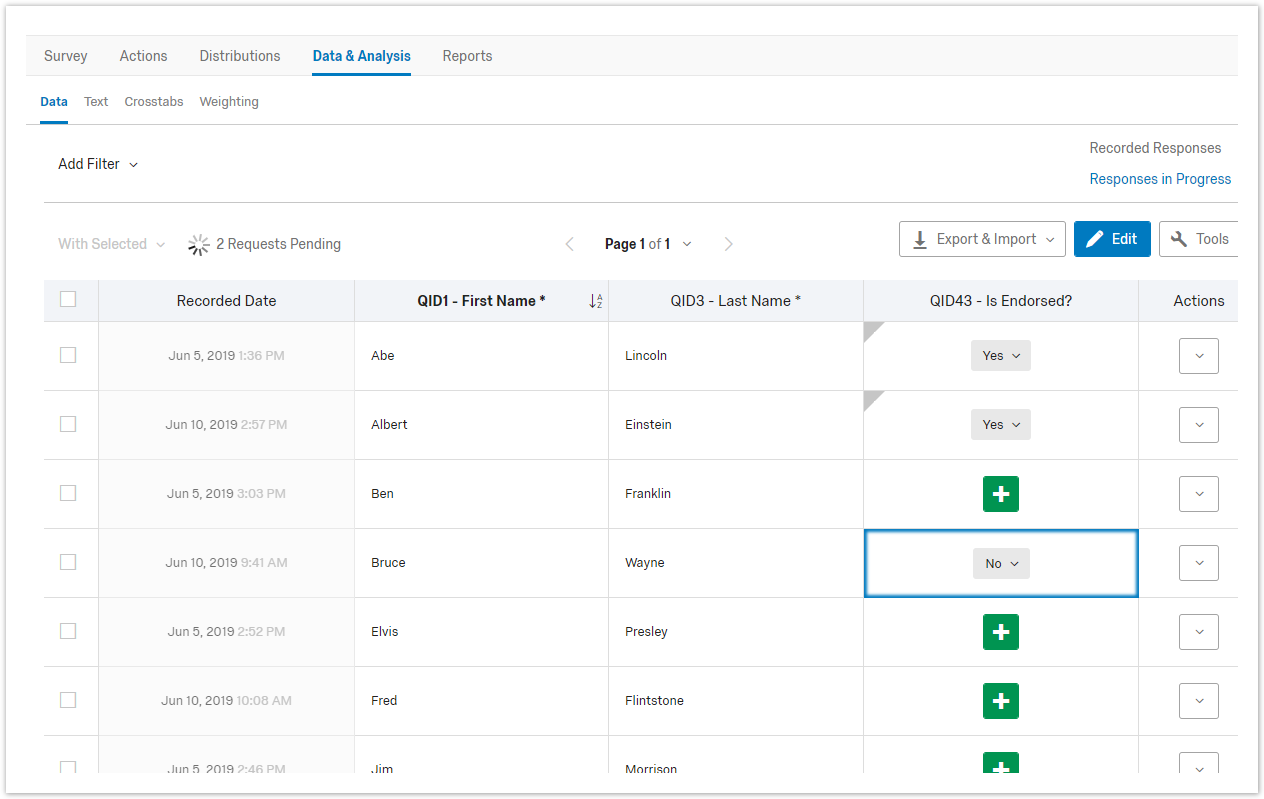
- Marking applications as endorsed
As you receive endorsements you can use this field to mark each application as endorsed- Open the project
- Click Data & Analysis
- If you do not see the "Is Endorsed" question
- Click Tools > Choose Columns
- Click the "Is Endorsed" question
- Click Tools to close the menu
- To Edit the "Is Endorsed" question
- Click "Edit"
- Click the + icon
- Select yes or no
- Click "Edit" when done
Tracking Endorsements when using Post-Application Endorsement Survey
When the Endorse phase is complete (or during the endorsement cycle, but will need to be done again when all endorsements are in)
...
Locate the “LoginID” column and the “Is Endorsed?” column
If you do not have an "Is Endorsed?" column, add one next to the "LoginID" column
Paste the following code into the first empty cell of the “Is Endorsed?” column (where there is a value for LoginID in the adjacent column)
...
- - replace “AT4” with the cell number of the first record in the LoginID column (the row number should match)
- - replace “$S:$S” with the column letter you noted from the endorsements sheet (i.e. $AU:$AU)
- The question mark “?” is to indicate that there was no endorsement found (as opposed to an explicit no)
...
Paper Endorsements
The Harvard Catalyst Education Program has bypassed the need for an endorsement cycle/survey by requiring the applicant to download a PDF of the endorsement form and upload it as part of their application. The program admin visually inspects the uploaded endorsement then marks the application as endorsed. This works if the endorsement can be seen and transported by the applicant.
Creating Applications for Review in Qualtrics
Average Overall Score: On the Review form there can be several questions, including an Overall Score question. The Program Admins currently have the ability to average those overall scores. The feature is broken in Apply Hub so we've given the PAs instructions on how to tally those in Excel.
| Jira | ||||||
|---|---|---|---|---|---|---|
|
Reviews in Qualtrics
Building the Application Requiring Review
- Add all questions, logic, actions (email), etc.
- Click Survey Flow
- Click ""Add a New Element Here"
- Select Embedded Data
- Type "appID"
- Click "Set a Value Now"
- From the dropdown select Insert Piped Text > Random Number: Integer 10000...99999
- Click "Insert"
- Drag this block above the Default Question Block (Use Move)
- Click "Save Flow"
- Click ""Add a New Element Here"
- Add a Contact List Trigger
- Tools > Triggers > Contact List Trigger
- Select New Contact List
- Type: [a name that matches your application, including date]
- Click "Save" (same line to the right)
- Map First Name, Last Name, and Email to the associated fields in the survey
- Under External Data Reference select Embedded Data and enter "appID" (formerly LoginID)
- Click Add Additional Fields
- Enter every field from the application survey, in order (Click + to add more fields)
- The field on the left is your variable name, it should be short and not contain spaces
- For open-ended questions select choice should be the question text not "Question Text"
- For multiple choice questions choose "Selected Choices" or "Selected Cho...Entered Text"
- For the file uploads type a memorable name (i.e. adminDoc) and select "File URL"
- Click SaveTriggers
Pre-Review Phase
Adding links to external documents
If you need to de-identify or otherwise prepare documents to share with reviewers you can save files to the Library, then insert the URL into a new column in the Contact List. The column name should follow variable naming rules above. To find the URL:
- go to Library > Files Library
- click the gear on the right
- select View File > View
- From the address bar copy the question mark and everything that follows
- append it to "https://hms.az1.qualtrics.com/CP/File.php" e.g. hms.az1.qualtrics.com/CP/File.php?F=F_dj24Aa62uFEqWIR
- create a new column in the Contact List e.g. applicantCV
- paste the URL in the row that matches the applicant
Notify Reviewers: You will need to email the reviewers offline, with the link to the review form and the Application ID for each application you'd like them to review. Example:
Dr. Polumbo,
Thank you for agreeing to review C/T Applications. Please review the following applications.
Antonia Abracadabra
Application ID#: 262430
Cynthia Crustacean
Application ID#: 390841
To complete these reviews, visit the following link and enter the Application ID # for each application from above.
https://hms.az1.qualtrics.com/jfe/form/SV_6VTsO7LITMTRpEV
Thanks!
Building the Review form(s)
- You will send an email to each reviewer with the applications to review
- Add all review questions, logic, etc.
- Add placeholders for any text that you want to pipe in (personalize)
- Click "Survey Flow"
- Click "Add a New Element Here"
- Click "Authenticator"
- Authentication Type: Contact
- Under "Authenticate Using Contact", select the Contact list that you created for the application form
- Under "Authentication Fields"
- Select "External Data Reference"
- Type a label: Application ID
- Check Pre-Fill and enter "appID" (this is case sensitive and must match the Embedded Data that you added in the Survey Flow of the application)
- Click "Options"
- Select or create custom message(s) for login screen e.g. To provide a review please enter an Application ID sent via email.
- Using "Move" at the bottom of the question block, click and hold to drag the question block under the Authenticator block
- Click "Add a New Element Here"
- Click "Embedded Data"
- Create new fields for each item from the application that you want to show on the review form (firstName, lastName, projectTitle, researchProposal, etc)
- For each, click Set a Value Now
- Click the dropdown arrow
- Select "Insert Piped Text"
- Select "Embedded Data Field" (first, last, and email are under Panels Field)
- Click dropdown arrow
- Select the data to assign to this field (if you do not see the data try saving and reopening or just type it in)
- this is case-sensitive, be sure everything matches the variables from the application
- Click "Insert"
- Click "Add a New Field" and repeat as needed
- Using "Move" at the bottom of the block, click and hold to drag the block under the Authenticator block and above the question block
- Click "Save Flow"

- Update the placeholders
- Click on the question that you want to personalize
Click Rich Content Editor
- Place your cursor where you want to insert a field from the applicant's survey
Click the {a} icon
- Select Embedded Data
- Click the dropdown
- Select the field to insert
- Click "Insert"
- Repeat for each field that you want to insert
- Inserting URLs for uploaded docs
Place your cursor where you want to insert a field from the applicant's survey
Click the {a} icon
- Select Embedded Data
- Click the dropdown
- Select the field with the document URL that you created in the applicant survey
- Click "Insert"
- Highlight and copy this string
- Click the link icon
- Paste the string into the URL field
- Select Protocol <other>
- Replace the Display Text with clickable text to display i.e. View Scientific Proposal
- Click the Target tab
- Select "New Window (_blank)"
- Click "OK"
- Remember to Publish your survey.
If you wanted to you could use a contact list trigger to add review1Score, review2Score, review3Score fields to the contact list. You could then calculate average score.
Testing Your Surveys
- Fill out application survey, reviewing all questions, logic, and appearance. Use a real email address (yours) so you can review email notifications. Note that Harvard might block repeated emails with the same content, so you may consider using a personal email address.
- Follow link(s) to endorsement survey and/or review survey. Fill out surveys, reviewing all questions, logic, and appearance. Use a real email address (yours) so you can review email notifications.
- Review all email notifications for piped-in content (ie endorser name), links, email subject, text.
Best Practices and Tips
Keeping the Survey to One Page
It is recommended that you keep your surveys to one page whenever possible. This will allow people to see all of the questions in order to prepare their responses, and it will help to reduce survey fatigue.
- Each block is on a different page. Avoid blocks to keep all on one page.
- Conditional questions are validated via the next arrow button using "display logic." This can be avoided for "If Other, Please Specify": Multiple Choice > Single or Multiple Answer > Add Other and on dropdown next to text box, select Allow Text Entry.
- If keeping the survey on one page isn't possible:
- Add this language to the first page: "Please read the RFA (link) to ensure you have the required materials before beginning this form." Include material requested on survey in the RFA.
- To prevent multi-page, we display Institution as a picklist as opposed to a dropdown list. Qualtrics doesn't do in-page validation for dropdown menus. so a picklist allows you to include an Other Institution text box.
Requesting or Requiring a response for "Other"
How to collect a text response when someone chooses "other" from a Multiple Choice question.
- Question Type: Multiple Choice
- Answers: Single Answer OR Multiple Answer
- Click "Click to write choice..." (if you are editing an existing answer, click on the answer text)
- Type "Other"
- Click the arrow to expand the dropdown
- Click "Allow Text Entry"
- To require this field...
- Click the arrow to expand the dropdown
- Click Text Entry Validation > Force Response
- If the answers are in multiple columns and there are an uneven number of answers, don't put Other as last option. If you do it will push down other options.
Updating Published Surveys
Changes will only be presented to respondents after you click the Publish button. Then, only respondents who didn’t start the survey until after you published will see new changes you’ve made to the survey.
If you want respondents who started before you published to experience the changes, then they will need to start their survey over.
- If you distributed the survey through the Anonymous Link, ask them to clear their browser cache, open an incognito window, or try to take the survey in a different browser.
- If you distributed the survey through email or personal links, send them a new Individual Link.
More Tips
- Include the name of your offering cycle at the top of your survey. If you want to include introductory text, keep it brief.
- Test your surveys: Answer all questions on the surveys, submit it, review email templates, check survey flow, etc.
- Harvard Catalyst reports on Institution, so having an "Other Institution" text box is important. Degree and rank aren't reported, so no need for an Other text box there.
- Include at the top of your survey: "This application form cannot be saved. Please prepare your responses and save elsewhere before starting this form."
- Survey Options > Survey Expiration - This allows you to set a date by which no more applications can be submitted.
- Change navigational buttons from arrows to "Submit": Look and Feel -> Next Button Text - type "Submit." This makes it clear that there are no additional pages past this one.
If you are using multiple pages, specify different text for the next buttons. For instance "Start application," "Continue," "Submit." (Block Options > Next/Previous button text) - LoginID is random and non-sequential. This is by design to hinder access to others' applications.
- Link the endorsement and/or review surveys to the application survey by including LoginID in the endorsement email, endorsement form, applicant email, reviewer email, and reviewer form.
- To validate email addresses: Content Validation > Content Type: Email Address
- To validate phone numbers: Content Validation > Content Type: US Phone (Does NOT allow for extensions.)
- T Domain question (or any question where one selection clears the others): Select "Make Answer Exclusive" (next to Undecided, in dropdown) to clear all other selections
Agree to program requirements checkbox:
- Multiple Choice, Choices = 1, Multiple Answers (allows unchecking the box), Force Response (prevents form submission without agreement)
- Question: "To apply you must agree to the program requirements"
- Answer: "By checking this box, I certify that I understand the program requirements and agree to abide by them if I am accepted into this course."
- Use Rich Content Editor to add program requirements (RFA) link. Change target to "_blank" so it opens in a new window.
- PDFs (FAQs and RFAs) can be housed on the Harvard Catalyst website. Email WebUpdates@catalyst.harvard.edu
- Service pages will link to FAQ and RFA and will include date information and a link to the Qualtrics application survey.
Required Fields (Qualtrics doesn't automatically add asterisks to required fields.)
- If you want to indicate required fields, add the asterisk manually to each question and include "* = Required Field" near the top of the survey.
- To require fields, select "Force Response" in the question settings in the right column.
- You can select multiple questions at once using the checkbox at the top left of each question then select "Force Response" in the right column
- Section Headings: Add a question as Descriptive Text, then use Rich Content Editor to make it bold.
- Help Text: Using Rich Content Editor, put help text on line below question, in italics and smaller font (eg 10px)
- Harvard Authentication: Since the application forms are not behind login, you can ensure applicants are at Harvard by adding a required field for eCommons username or Harvard email.
- If Endorser email is wrong (applicant entered it wrong), you can replicate the endorser email. Include the link to the endorser survey: append endorser survey anonymous link URL with ?LoginID=${e://Field/LoginID}
...