You are viewing an old version of this page. View the current version.
Compare with Current
View Page History
« Previous
Version 141
Next »
stOnce this page is ready, ask Mike to make it public. Looks like it is possible to not be indexed by search engines:
https://community.atlassian.com/t5/Jira-questions/Where-to-put-the-robots-txt-file-on-standalone-confluence-or/qaq-p/141572
I'm just playing around with ideas to make this guide more user friendly
Building the Endorser Survey (optional; you can alternatively accept endorsements via email)
- Click "Create Project"
- Create questions and add any preferred logic.
- Add a question of type Text/Graphic to display applicant data
- Add instructions to endorser
- Add a placeholder for each field that you want to display (e.g. applicant first and last name)
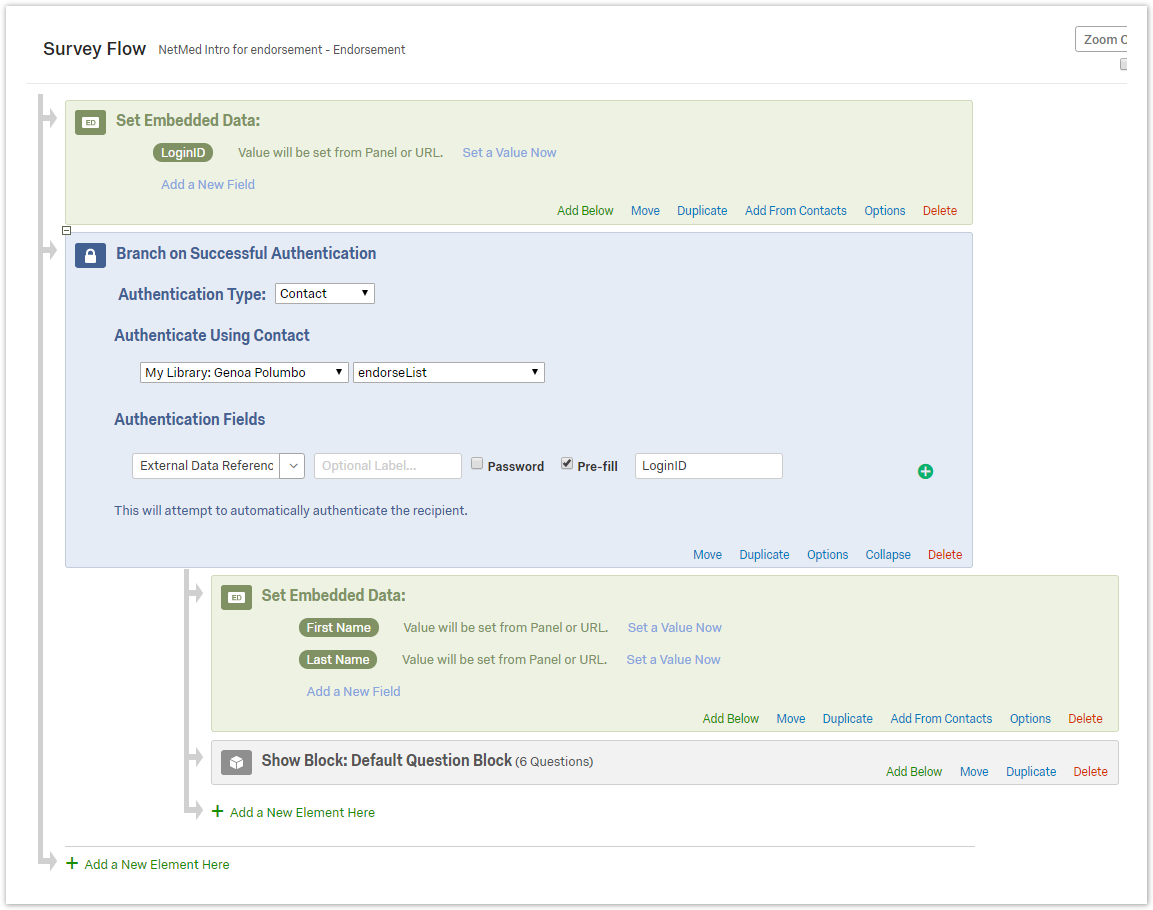
- Click Survey Flow
- Click Add a New Element Here and select Authenticator
- Authentication Type: Contact
- Authenticate Using Contact: (select "EndorseList-HMSLeadership-March2020" or whatever contact list name you used in the Application survey)
- Authentication Fields: External Data Reference; check "Pre-fill"; type "appID"
- Move the Authenticator Block above Question Block
- Click Add a New Data Element Here and click Embedded Data
- Type "appID"
- Move above all other blocks
- Click Add a New Data Element Here and click Embedded Data
- Add each element that you want to reference from the Applicant survey (e.g. applicant first and last name)
- Type the field name, i.e. applicantFirst (Make sure the field names match)
- Click Set a Value now
- From the dropdown select Insert Piped Text > Panels Field > Recipient First Name
- Repeat for each field that you want to retrieve from the Contact List (applicantLast, applicantEmail, endorserFirst, endorserLast, etc,)
Other than applicant first name, last name, and email, all other fields will be found under Piped Text > Embedded Data
- Move this block below Authenticator and above the question block
- Click Save Flow
- Add Applicant data to the placeholder questions
- Click the question text to edit
- Select Piped Text > Panels Field > from dropdown, select applicantFirst, applicantLast, etc.
or, Piped Text > Embedded Data for all other fields
- Add a Contact List Trigger to record endorsement
- Tools > Triggers > Contact List Trigger
- Click "Please Select"
- Select My Library:...
Select the same contact list used for the application e.g.EndorseList-HMSLeadership-March2020
- Under External Data Reference select Embedded Data and enter "appID"
- Click "Add additional fields"
- For Field Name type "Is_Endorsed"
- Select Question, then select the question that best indicates endorsement
- If it is a checkbox choose "Select Choices Recode"
- Click Save Triggers
- Customize the Endorser email
- Copy the Anonymous Link of the Endorser Survey
- Click Distributions
- Click Get Reusable Link (if visible) or click "Anonymous Link"
- Copy the Anonymous Survey Link
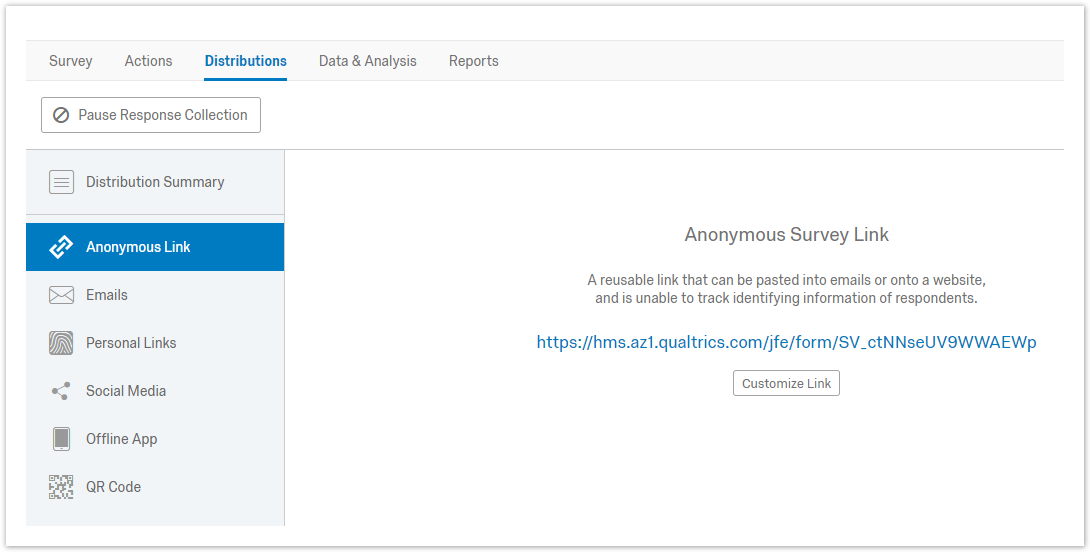
- Paste the Anonymous Link to the Endorser Survey into the Endorser email (within the application survey)
- Append anonymous link URL with ?appID=${e://Field/appID}
- Be sure to take a look at the Survey Options to make sure it is set up properly (specifically, make sure Open Access is selected)
- You are ready to test. Fill out the applicant survey and include your own email as the endorser. Once you receive the endorsement request email, complete that survey
Copying From a Previous OC
You will be copying the two surveys that best match the current OC (an applicant survey and an endorser survey). Edit the titles as needed.
Applicant survey - copying from previous
Click "Create Project"
- Click "Create From Existing"
- Select Source Project
- Enter a new Project Name
- Click "Create Project"
Edit the questions, logic, etc., as necessary
Click Survey Options > make sure Open Access is selected (review all other settings). This allows anyone to access the application survey.
Edit the Contact List Trigger
You will be using this contact list as a database to store name/value pairs that you can pull from the application survey into the endorser survey.
Tools > Triggers > Contact List Trigger
Click "Add respondent to the panel...[NAME OF CONTACT LIST]"
Change to a new Contact List
Click on the name of the existing Contact List
- From My Library, click "New Contact List"
Type the name of your new list (choose a name specific to the current offering cycle)
Click Save (not Save Triggers, which closes the pop-up)
This must be in addition to Save Triggers, which is next.
Click SaveTriggers
- Verify that email Actions have carried over and edit as necessary. If they haven't carried over from the survey you copied, follow the next steps.
Add email action for applicant (confirmation email upon submitting application survey)
- Add email action to send an email to the endorser when the application survey is submitted.
- Click Actions > Add Action
- Event: Survey Response
- Conditions: N/A
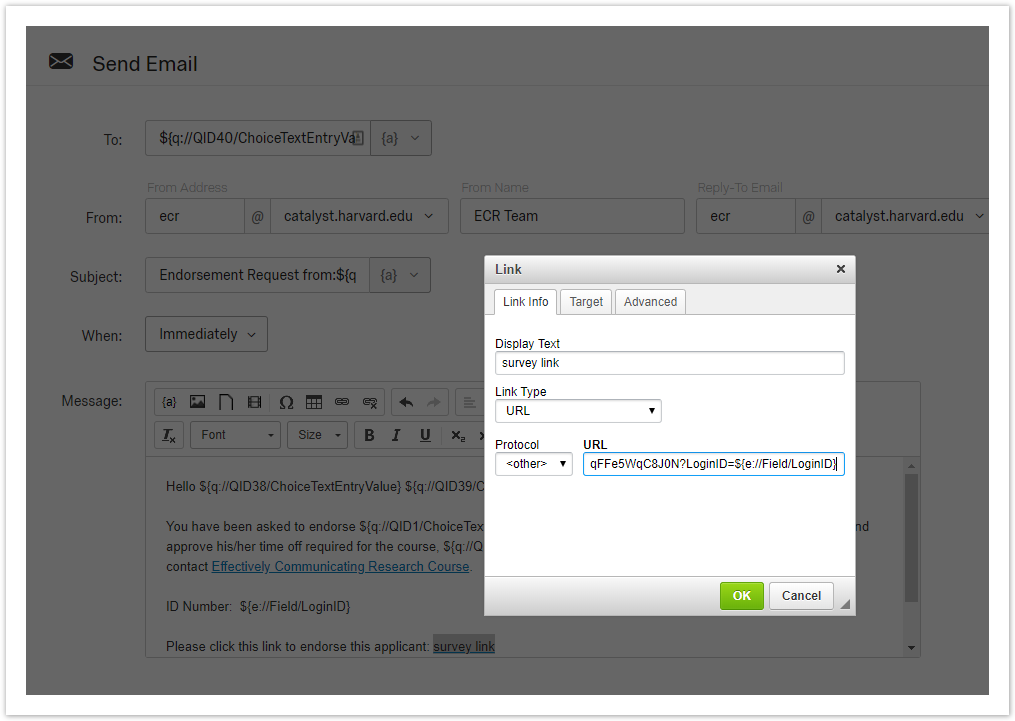
- Tasks: Send Email
- To: from the dropdown, select Survey Question > Endorser Email > Endorser Email
- You can copy your departmental email address on messages. Separate 'To' emails with a comma. Each recipient will only see their own email address, so it acts as a BCC.
- Add a From Address, From Name, and Reply-To Address
- In the Subject field
- Type "Endorsement request from " (note the space after "request from ")
- From the {a} dropdown select "Survey Question" > [endorser_name]
- Add instructions to the Message field
- Instructions for the endorsement process
- Pipe in appID, applicant first/last, your contact information, etc.
NOTE: applicant first, last, and email can be found under Piped Text > Panels Field
- If you would like to collect the endorser's response using email you are done with the Applicant survey and can begin testing. Make sure to use your own email address when submitting forms to review email templates as well as all surveys and flows.
OR
- If you would like to collect the endorser's response using a Qualtrics survey, you will need to come back to this email action once you've completed the endorser survey.
Endorser survey - copying from previous (optional; you can alternatively accept endorsements via email)
- Click "Create Project"
- Click "Create From Existing"
- Click "Select a Project"
- Enter a Project Name
- Click "Create Project"
- Edit the questions, logic, etc.
- Click Survey Flow
- If the fields that you are transferring differ from the original applicant survey, you will need to edit the Survey Flow, otherwise no changes are needed
- If the fields that you transferred differ from the original applicant survey you will need to edit some questions
- Click the question text to edit
- Select Piped Text > Embedded Data Field > [field name]
NOTE: applicant first, last, and email can be found under Piped Text > Panels Field
- Customize the Endorser email
- Copy the Anonymous Link of the Endorser Survey
- Click Distributions
- Click Get Reusable Link (if visible)
- Click "Anonymous Link"
- Copy the Anonymous Survey Link
- Go back to the Applicant survey
- Click "Actions"
- Click to open the endorsement email
- Click "Send E-mail Task" in section 3
- Paste the Anonymous Link of the Endorser Survey into the Message section
- Append with ?appID=${e://Field/appID}
- Click "Save"
- Be sure to take a look at the Survey Options to make sure they are set up properly
- You are ready to test. Fill out the applicant survey and include your own email as the endorser. Once you receive the endorsement request email, complete that survey.
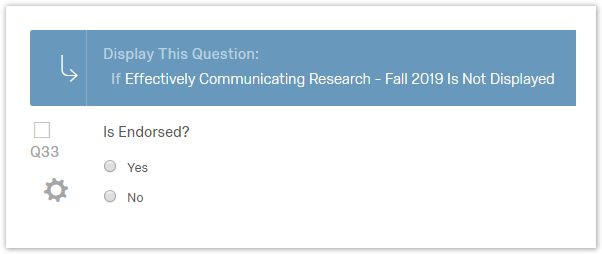
Creating a hidden question that can be used to document status as Endorsed
- Marking applications as endorsed
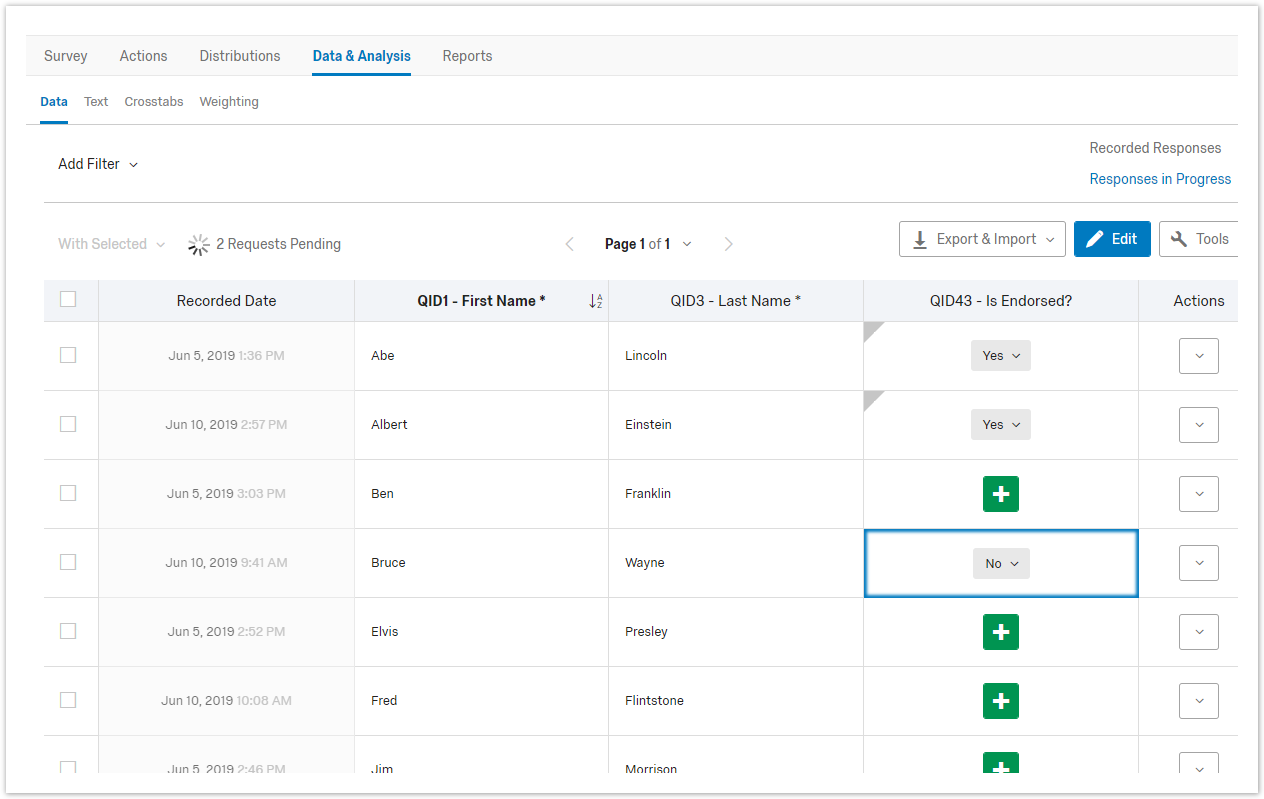
As you receive endorsements you can use this field to mark each application as endorsed- Open the project
- Click Data & Analysis
- If you do not see the "Is Endorsed" question
- Click Tools > Choose Columns
- Click the "Is Endorsed" question
- Click Tools to close the menu
- To Edit the "Is Endorsed" question
- Click "Edit"
- Click the + icon
- Select yes or no
- Click "Edit" when done
Tracking Endorsements when using Post-Application Endorsement Survey
When the Endorse phase is complete (or during the endorsement cycle, but will need to be done again when all endorsements are in)
- Download as CSV the data for both the application survey and the endorsement survey
- Open them in two side by side windows
- Click and hold the tab for endorsement sheet (bottom left) and drag it over to the right of the tab for the application sheet
- You can close the window with the Endorsement sheet
- Double click to rename the tab that you just dragged over to “endorsements”
- Make note of the letter of the appID column (e.g. “S”)
- Click on the tab for the application sheet
Locate the “appID” column and the “Is Endorsed?” column
If you do not have an "Is Endorsed?" column, add one next to the "appID" column
Paste the following code into the first empty cell of the “Is Endorsed?” column (where there is a value for appID in the adjacent column)
=IF(ISNA(VLOOKUP(AT4,endorsements!$S:$S,1,FALSE)), "?", "Yes")
- - replace “AT4” with the cell number of the first record in the appID column (the row number should match)
- - replace “$S:$S” with the column letter you noted from the endorsements sheet (i.e. $AU:$AU)
- The question mark “?” is to indicate that there was no endorsement found (as opposed to an explicit no)
- Select/highlight the cell with the formula and as many cells below as needed (i.e. as long as there is a value in adjacent appID column)
- Select Edit > Fill > Down
- All cells should now be filled with either a Yes or a question mark
Paper Endorsements
The Harvard Catalyst Education Program has bypassed the need for an endorsement cycle/survey by requiring the applicant to download a PDF of the endorsement form and upload it as part of their application. The program admin visually inspects the uploaded endorsement then marks the application as endorsed. This works if the endorsement can be seen and transported by the applicant.
Creating Applications for Review in Qualtrics
Average Overall Score: On the Review form there can be several questions, including an Overall Score question. The Program Admins currently have the ability to average those overall scores. The feature is broken in Apply Hub so we've given the PAs instructions on how to tally those in Excel.
CATALYSTAPPLY-5236
-
Getting issue details...
STATUS
Reviews in Qualtrics
You will be building two surveys (three if your offering cycle has an endorse cycle as well). The first survey is for applicants. The second survey will be used for all reviewers. Once the application cycle (and endorsement cycle) is complete. You will send an email to each reviewer with the anonymous link of the review form and the application IDs of the applications they are expected to review.
Building the Application Requiring Review
Pre-Review Phase
All of the application data submitted by applicants was saved to your Contact List. The review form will allow reviewers to pull up an applicants' data and files for review and submit a score.
Adding links to external documents
If you need to de-identify or otherwise prepare documents to share with reviewers you can save files to the Library, then insert the URL into a new column in the Contact List. The column name should not contain spaces and should be short but clear. To find the URL:
- Add all review questions, logic, etc.
- Add placeholders for any text that you want to pipe in (personalize)
- Click Survey Flow
- Click Add a New Element Here
- Click Authenticator
- Authentication Type: Contact
- Under Authenticate Using Contact, select the Contact list that you created for the application form
- Under Authentication Fields
- Select External Data Reference
- Type a label: Application ID
- Check Pre-Fill and enter "appID" (this is case sensitive and must match the Embedded Data that you added in the Survey Flow of the application)
- Click Options
- Select or create custom message(s) for login screen e.g. To provide a review please enter an Application ID sent via email.
- Using Move at the bottom of the question block, click and hold to drag the question block under the Authenticator block
- Click Add a New Element Here
- Click Embedded Data
- Create new fields for each item from the application that you want to display on the review form
- Type a field name (name should not contain spaces and should be short but clear)
- For each, click Set a Value Now
- Click the dropdown arrow
- Select Insert Piped Text
- Select Embedded Data Field (first, last, and email are under Panels Field)
- Click dropdown arrow
- Select the data to assign to this field (if you do not see the data try saving and reopening or just type it in)
- this is case-sensitive, be sure everything matches the variables from the application
- These are the field names that you used when creating the Contact List Trigger in the application
- Click Insert
- Click Add a New Field and repeat as needed
- Using "Move" at the bottom of the block, click and hold to drag the block under the Authenticator block and above the question block
- Click Save Flow

- Update the placeholders
- Remember to Publish your survey.
Notify Reviewers: You will need to email the reviewers offline, with the link to the review form and the Application ID for each application you'd like them to review. Example:
Dr. Polumbo,
Thank you for agreeing to review C/T Applications. Please review the following applications.
Antonia Abracadabra
Application ID#: 262430
Cynthia Crustacean
Application ID#: 390841
To complete these reviews, visit the following link and enter the Application ID # for each application from above.
https://hms.az1.qualtrics.com/jfe/form/SV_6VTsO7LITMTRpEV
Thanks!