You are viewing an old version of this page. View the current version.
Compare with Current
View Page History
« Previous
Version 60
Next »
Accessing Qualtrics
Everyone with an eCommons account can access Qualtrics. We have set up this guide assuming program administrators will log into Qualtrics to administer their surveys, and applicants, endorsers, and reviewers will not need to log into Qualtrics.
- Navigate to the eCommons website, https://ecommons.med.harvard.edu/default.asp, and log in.
- Click Applications from the upper left, then click Qualtrics Survey Tool from the list.
Sharing Library messages etc.
As a Brand Administrator, you can use Groups to allow two or more users to share projects, graphics, files, and messages in Libraries. Users within Groups can also share contact lists in their Contacts page. Groups can include everyone in your organization, everyone in a specific Division, or only specific users that you manually select. Groups administration can only be accessed by Brand and Division Administrators in the Admin page. Contact the HMS Qualtrics administrator, Tamara Will at servicenow@hms.harvard.edu to have a Qualtrics group created.
Qualtrics workflow - Application cycles with Endorsements

Applications with an Endorsement Cycle
Creating a New Unique OC
Create two surveys -- the application and the endorsement. Title them accordingly, eg, ECR Application 2019, ECR Endorsement 2019.
Applicant survey
- Add questions.
- Be sure to include questions for Endorser Name and Email.
- Leave Endorser first and last name in one field if you don't need to split them up for easier piping into other places.
- You may consider initially only including the survey questions to be displayed on the endorsement survey / in emails. This will allow you to test the workflow by submitting the forms quickly without having to complete the entire survey. Once the survey is functioning properly, you can add the rest of the survey questions.
- Click Survey Options > select Open Access (and review all settings). This allows anyone to access the application survey.
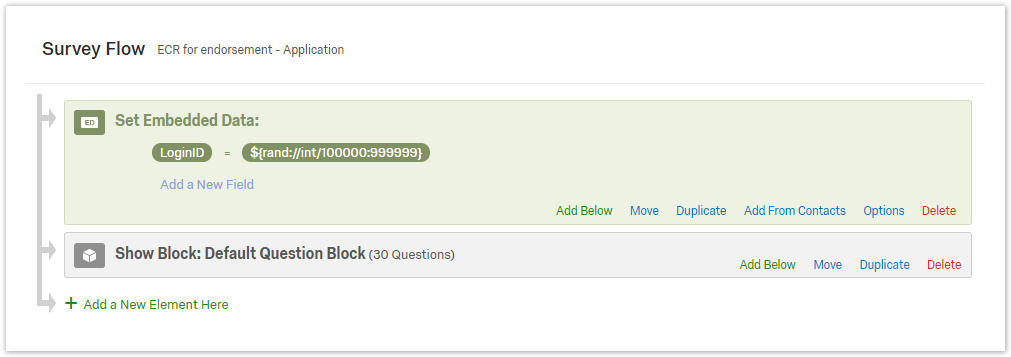
- Click Survey Flow
- Click Add a New Element Here
- Click Embedded Data
- Type "LoginID"
This is the key field that will be used to ensure that the endorser is accessing the correct record. Be sure the case matches everywhere. - Click Set a Value Now
- From the dropdown, select Insert Piped Text > Random Number > Integer 100,000...999,999
This method does run the remote possibility of duplication. - Drag this new block above the Question Block (using Move)
- Click Save Flow
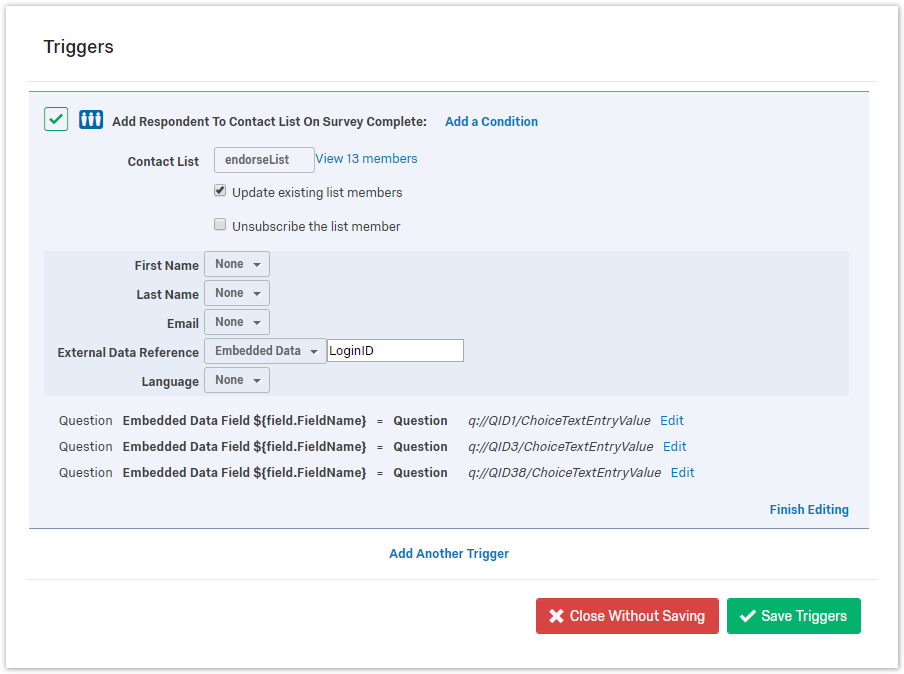
- Add a Contact List Trigger
You will be using this contact list as a database to store name/value pairs that you can pull from the application survey into the endorser survey.- Tools > Triggers > Contact List Trigger
- Click "Please Select"
- Select My Library:...
- Click New Contact List
Specify unique name based on offering cycle name, eg EndorseListECR2019
(this will reduce possibility of duplication)
- Click Save (not Save Triggers, which closes the pop-up)
- Under External Data Reference select Embedded Data and enter "LoginID"
- Click "Add additional fields"
- Enter each field from the application survey that you want to display on the endorsement survey (Click + to add more fields) (first name, last name, email?)
- Set the value of each field with the "Select Question" and "Select Choice" drop downs
- Click Save Triggers
Note: to edit/view existing trigger details, click the name of the trigger, eg, "Add respondent to the panel..."
- Add email action to send a confirmation email to the applicant when the application survey is submitted.
- Click Actions > Add Action
- Event: Survey Response
- Conditions: N/A
- Tasks: Send Email
- To: from the dropdown, select Survey Question > Email > Email
- You can copy your departmental email address on messages. Separate 'To' emails with a comma. Each recipient will only see their own email address, so it acts as a BCC.
- Add a From Address, From Name, and Reply-To Address
- In the Subject field
- Type "Successful Application of (name of your offering cycle)"
- Add information to the Message field
- Pipe in the LoginID so they can reference it if they need to contact you.
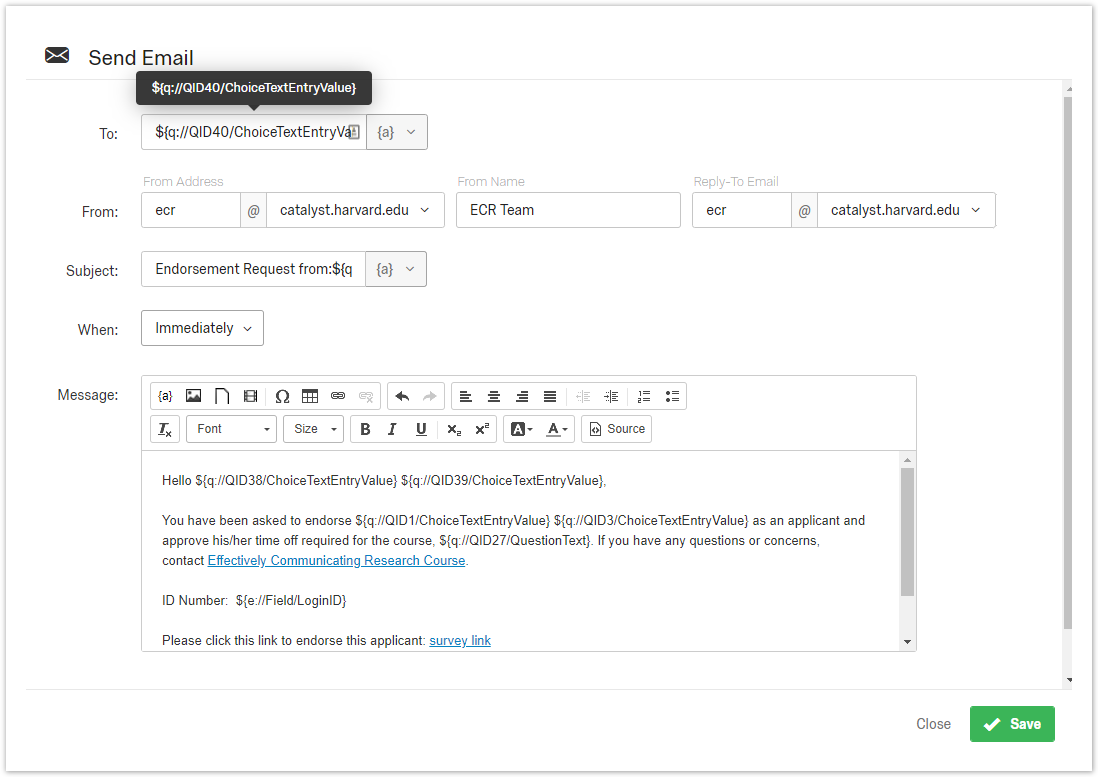
- Add email action to send an email to the endorser when the application survey is submitted.
- Click Actions > Add Action
- Event: Survey Response
- Conditions: N/A
- Tasks: Send Email
- To: from the dropdown, select Survey Question > Endorser Email > Endorser Email
- You can copy your departmental email address on messages. Separate 'To' emails with a comma. Each recipient will only see their own email address, so it acts as a BCC.
- Add a From Address, From Name, and Reply-To Address
- In the Subject field
- Type "Endorsement request from " (note the space after "request from ")
- From the {a} dropdown select "Survey Question" > [endorser_name]
- Add instructions to the Message field
- Instructions for the endorsement process
- Pipe in LoginID, applicant first/last, your contact information, etc.
- If you would like to collect the endorser's response using email you are done with the Applicant survey and can begin testing. Make sure to use your own email address when submitting forms to review email templates as well as all surveys and flows.
OR
- If you would like to collect the endorser's response using a Qualtrics survey, you will need to come back to this email action once you've completed the endorser survey.
Endorser survey (optional; you can alternatively accept endorsements via email)
- Click "Create Project"
- Create questions and add any preferred logic.
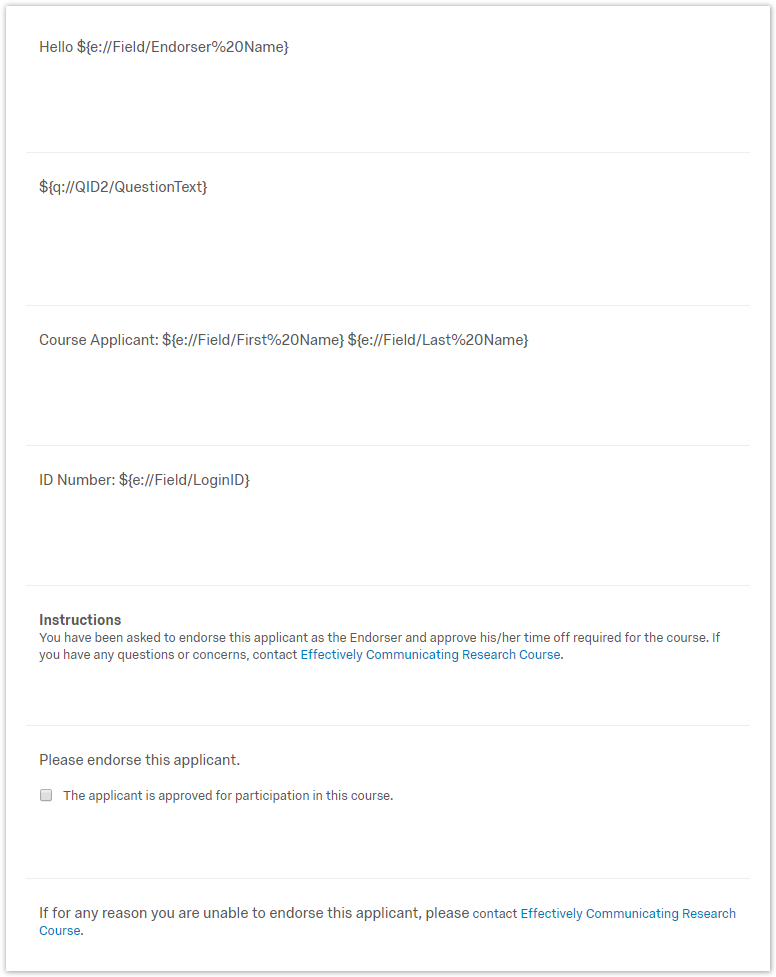
- Add a question of type Text/Graphic to display applicant data
- Add instructions to endorser
- Add a placeholder for each field that you want to display (e.g. applicant first and last name)
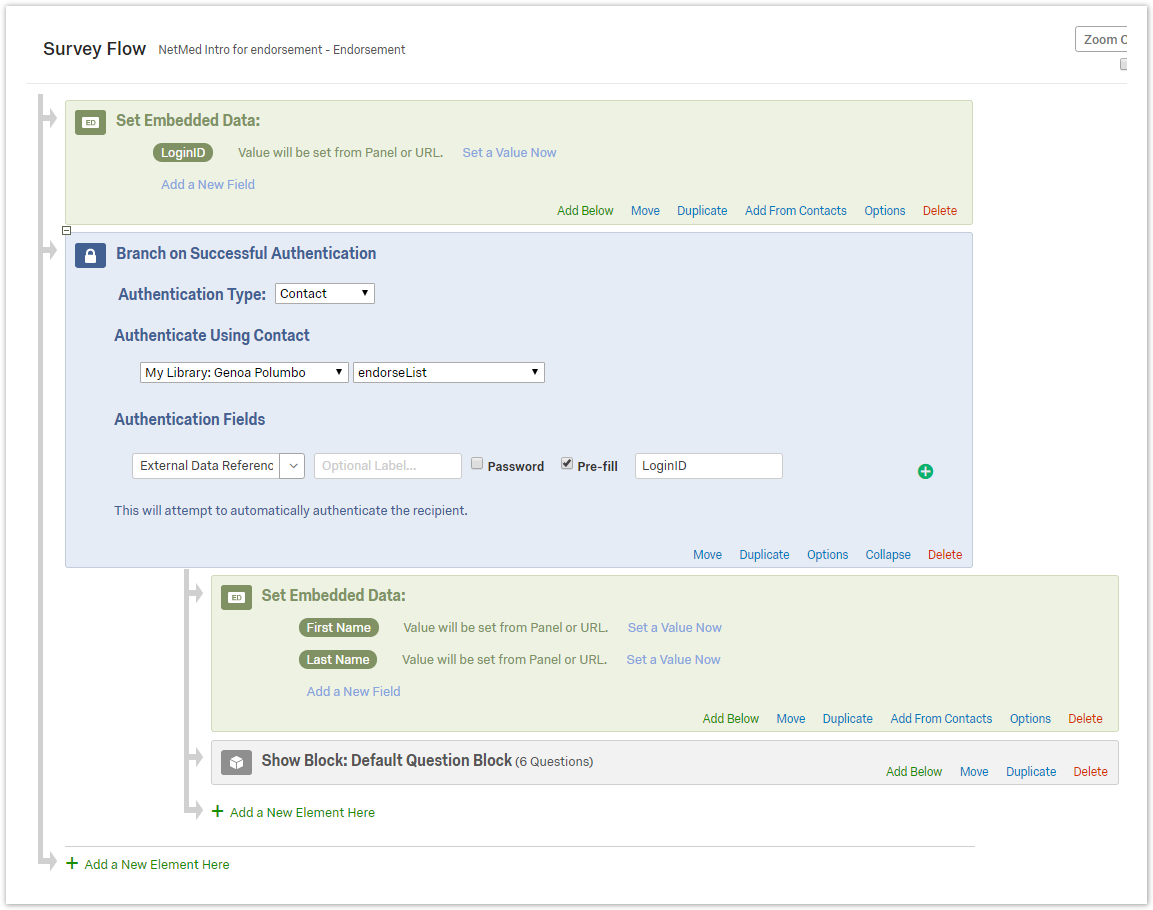
- Click Survey Flow
- Click Add a New Element Here and select Authenticator
- Authentication Type: Contact
- Authenticate Using Contact: (select "EndorseListECR2019" or whatever contact list name you used in the Application survey)
- Authentication Fields: External Data Reference; check "Pre-fill"; type "LoginID"
- Move the Authenticator Block above Question Block
- Click Add a New Data Element Here and click Embedded Data
- Type "LoginID"
- Move above all other blocks
- Click Add a New Data Element Here and click Embedded Data
- Add each element that you want to reference from the Applicant survey (e.g. applicant first and last name)
- Type the field name, i.e. Applicant First Name (Make sure the field names match)
- Move this block below Authenticator and above the question block
- Click Save Flow
- Add Applicant data to the placeholder questions
- Click the question text to edit
- Select Piped Text > Embedded Data Field > from dropdown, select Applicant First Name, Applicant Last Name, etc.
- Customize the Endorser email
- Copy the Anonymous Link of the Endorser Survey
- Click Distributions
- Click Get Reusable Link (if visible) or click "Anonymous Link"
- Copy the Anonymous Survey Link
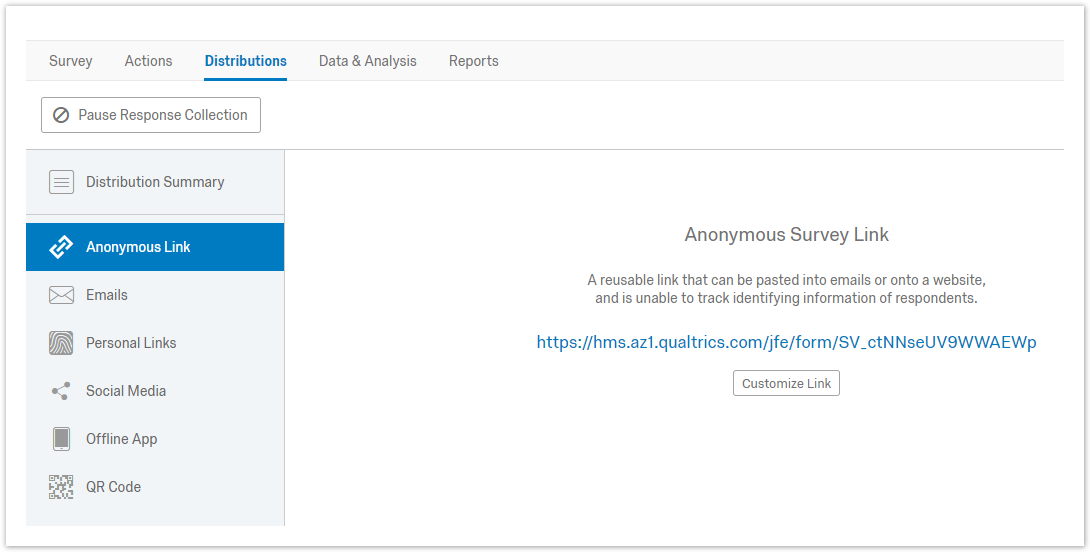
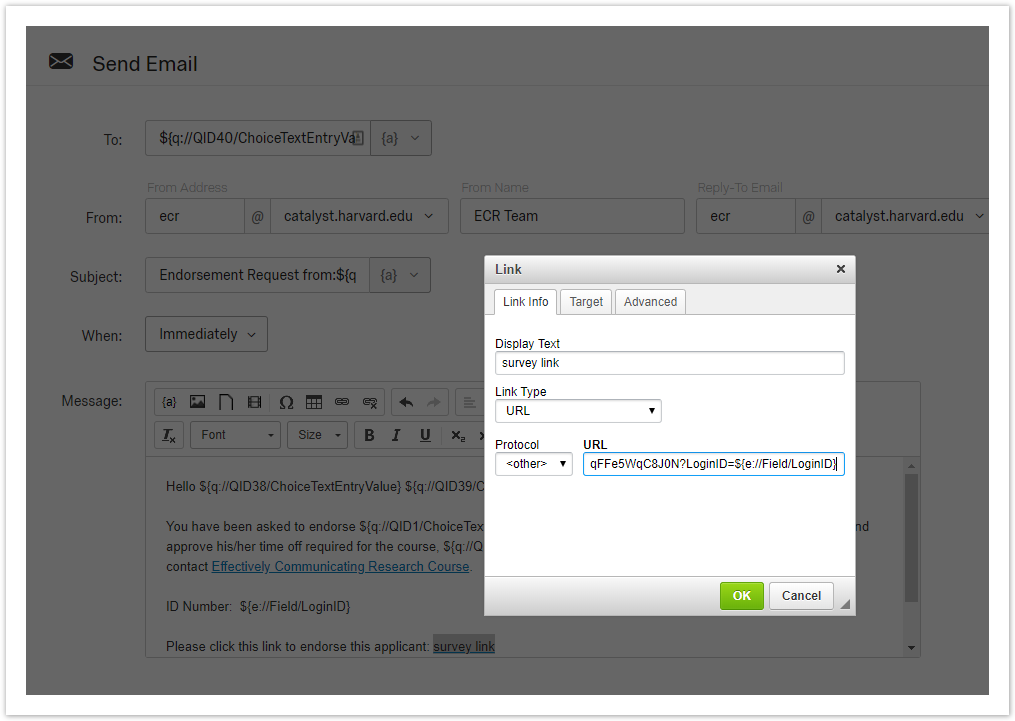
- Paste the Anonymous Link to the Endorser Survey into the Endorser email (within the application survey)
- Append anonymous link URL with ?LoginID=${e://Field/LoginID}
- Be sure to take a look at the Survey Options to make sure it is set up properly (specifically, make sure Open Access is selected)
- You are ready to test. Fill out the applicant survey and include your own email as the endorser. Once you receive the endorsement request email, complete that survey
Copying From a Previous OC
You will be copying the two surveys that best match the current OC (an applicant survey and an endorser survey). Edit the titles as needed.
Applicant survey - copying from previous
Click "Create Project"
- Click "Create From Existing"
- Select Source Project
- Enter a new Project Name
- Click "Create Project"
Edit the questions, logic, etc., as necessary
Click Survey Options > make sure Open Access is selected (review all other settings). This allows anyone to access the application survey.
Edit the Contact List Trigger
You will be using this contact list as a database to store name/value pairs that you can pull from the application survey into the endorser survey.
Tools > Triggers > Contact List Trigger
Click "Add respondent to the panel..."
Change to a new Contact List
Click on the name of the existing Contact List
- From My Library, click "New Contact List"
Type the name of your new list (choose a name specific to the current offering cycle)
Click Save (not Save Triggers, which closes the pop-up)
This must be in addition to Save Triggers, which is next.
Click SaveTriggers
- Verify that email Actions have carried over and edit as necessary. If they haven't carried over from the survey you copied, follow the next steps.
Add email action for applicant (confirmation email upon submitting application survey)
- Add email action to send an email to the endorser when the application survey is submitted.
- Click Actions > Add Action
- Event: Survey Response
- Conditions: N/A
- Tasks: Send Email
- To: from the dropdown, select Survey Question > Endorser Email > Endorser Email
- You can copy your departmental email address on messages. Separate 'To' emails with a comma. Each recipient will only see their own email address, so it acts as a BCC.
- Add a From Address, From Name, and Reply-To Address
- In the Subject field
- Type "Endorsement request from " (note the space after "request from ")
- From the {a} dropdown select "Survey Question" > [endorser_name]
- Add instructions to the Message field
- Instructions for the endorsement process
- Pipe in LoginID, applicant first/last, your contact information, etc.
- If you would like to collect the endorser's response using email you are done with the Applicant survey and can begin testing. Make sure to use your own email address when submitting forms to review email templates as well as all surveys and flows.
OR
- If you would like to collect the endorser's response using a Qualtrics survey, you will need to come back to this email action once you've completed the endorser survey.
Endorser survey - copying from previous (optional; you can alternatively accept endorsements via email)
- Click "Create Project"
- Click "Create From Existing"
- Click "Select a Project"
- Enter a Project Name
- Click "Create Project"
- Edit the questions, logic, etc.
- Click Survey Flow
- If the fields that you are transferring differ from the original applicant survey, you will need to edit the Survey Flow, otherwise no changes are needed
- If the fields that you transferred differ from the original applicant survey you will need to edit some questions
- Click the question text to edit
- Select Piped Text > Embedded Data Field > [field name]
- Customize the Endorser email
- Copy the Anonymous Link of the Endorser Survey
- Click Distributions
- Click Get Reusable Link (if visible)
- Click "Anonymous Link"
- Copy the Anonymous Survey Link
- Go back to the Applicant survey
- Click "Actions"
- Click to open the endorsement email
- Click "Send E-mail Task" in section 3
- Paste the Anonymous Link of the Endorser Survey into the Message section
- Append with ?LoginID=${e://Field/LoginID}
- Click "Save"
- Be sure to take a look at the Survey Options to make sure they are set up properly
- You are ready to test. Fill out the applicant survey and include your own email as the endorser. Once you receive the endorsement request email, complete that survey.
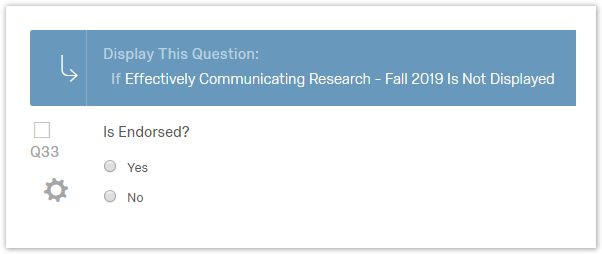
Creating a hidden question that can be used to document status as Endorsed
- Add a multiple choice question
- Add question text: "Is Endorsed?" or "Endorsed by Primary Endorser?"
- Choices: Yes/No
- Answers: Single Answer
- Actions: Add Display Logic
- Choose any existing question that is always displayed and select the condition "is not displayed"
This will ensure that the "Is Endorsed?" question is never displayed on the application survey, but it will display on your dashboard.
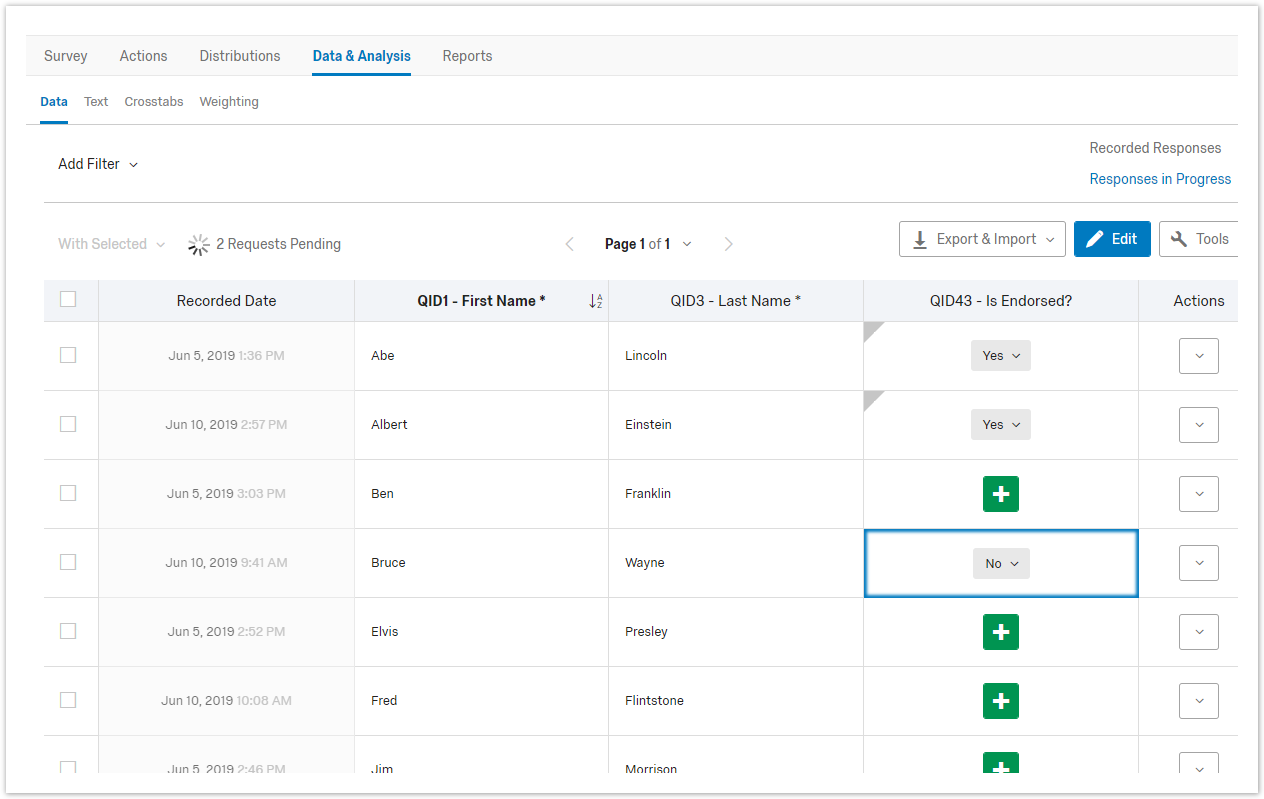
- Marking applications as endorsed
As you receive endorsements you can use this field to mark each application as endorsed- Open the project
- Click Data & Analysis
- If you do not see the "Is Endorsed" question
- Click Tools > Choose Columns
- Click the "Is Endorsed" question
- Click Tools to close the menu
- To Edit the "Is Endorsed" question
- Click "Edit"
- Click the + icon
- Select yes or no
- Click "Edit" when done
Best Practices and Tips (draft)
having all content on one screen, having minimal intro text, having OC name at top, testing the surveys, etc.
- Institution is reported on in Salesforce, so having an Other text box is important. Degree and rank aren't, so no need for an Other text box.
- "This application form cannot be saved. Please prepare your responses and save elsewhere before starting this form." Qualtrics allows users to save and come back. How? Do they need credentials?
- Survey Options > Survey Expiration
- Change navigational buttons from arrows to "Submit": Look and Feel -> Next Button Text - type "Submit." This makes it clear that there are no additional pages past this one.
_NOTE: If you are using multiple pages (i.e. blocks) you can specify different text for the next button on each page. For instance "Start application", "Continue", "Submit". - AppID/LoginID is random and non-sequential. This is by design to hinder access to others' applications.
- Link the endorsement and/or review to the application by including LoginID in the endorsement email, endorsement form, applicant email, reviewer email, and reviewer form.
Email Address
Content Validation > Content Type: Email Address
Phone Number
Content Validation > Content Type: US Phone (Does NOT allow for extensions.)
T Domain question (or any question where one selection clears the others)
Select "Make Answer Exclusive" (next to Undecided, in dropdown) to clear all other selections
Agree to program requirements question
- Multiple Choice, Choices = 1, Multiple Answers (allows unchecking the box), Force Response (prevents form submission without agreement)
- Question: "To apply you must agree to the program requirements"
- Answer: "By checking this box, I certify that I understand the program requirements and agree to abide by them if I am accepted into this course."
- Use Rich Content Editor to add program requirements (RFA) link. Change target to "_blank" so it opens in a new window.
Required Fields
Qualtrics doesn't automatically add asterisks to required fields.
- If you want to indicate required fields, add the asterisk manually to each question and include "* = Required Field" near the top of the survey.
- To require fields, select "Force Response" in the question settings in the right column.
- You can select multiple questions at once using the checkbox at the top left of each question then select "Force Response" in the right column
Requesting or Requiring a response for "other"
Here's how to collect a text response when someone chooses "other" from a Multiple Choice question.
- Question Type: Multiple Choice
- Answers: Single Answer OR Multiple Answer
- Click "Click to write choice..." (if you are editing an existing answer, click on the answer text)
- Type "Other"
- Click the arrow to expand the dropdown
- Click "Allow Text Entry"
- To require this field...
- Click the arrow to expand the dropdown
- Click Text Entry Validation > Force Response
- If the answers are in multiple columns and there are an uneven number of answers, don't put Other as last option. If you do it will push down other options.
Section Headings
Add a question as Descriptive text, then use Rich Content Editor to make it bold.