Applications with an Endorsement Cycle
Creating a New Unique OC
Create two surveys -- the application and the endorsement. Title them accordingly, eg, ECR Application 2019, ECR Endorsement 2019.
Applicant survey
- Add questions.
- Be sure to include questions for Endorser Name and Email.
- Leave Endorser first and last name in one field if you don't need to split them up for easier piping into other places.
- You may consider initially only including the survey questions to be displayed on the endorsement survey / in emails. This will allow you to test the workflow by submitting the forms quickly without having to complete the entire survey. Once the survey is functioning properly, you can add the rest of the survey questions.
- Click Survey Options > select Open Access (and review all settings). This allows anyone to access the application survey.
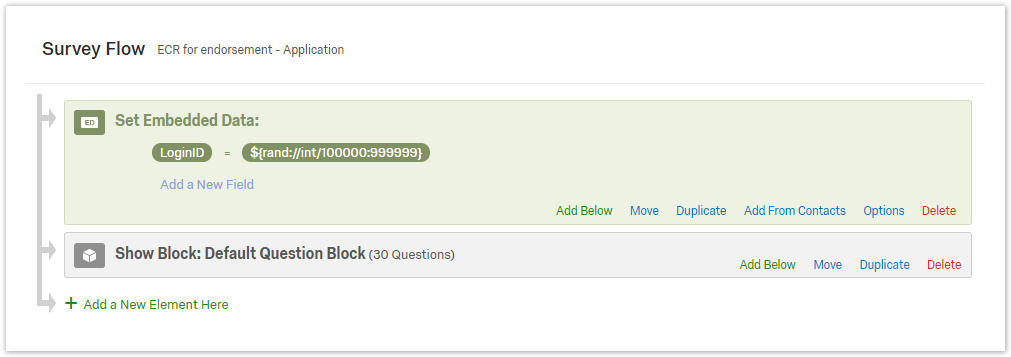
- Click Survey Flow
- Click Add a New Element Here
- Click Embedded Data
- Type "LoginID"
This is the key field that will be used to ensure that the endorser is accessing the correct record. Be sure the case matches everywhere. - Click Set a Value Now
- From the dropdown, select Insert Piped Text > Random Number > Integer 100,000...999,999
This method does run the remote possibility of duplication. - Drag this new block above the Question Block (using Move)
- Click Save Flow
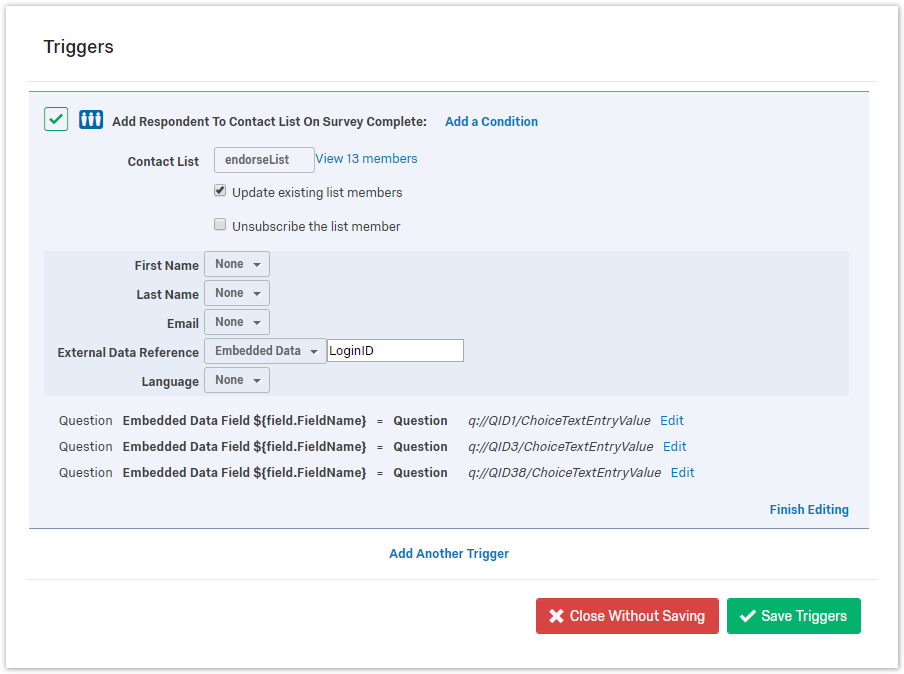
- Add a Contact List Trigger
You will be using this contact list as a database to store name/value pairs that you can pull from the application survey into the endorser survey.- Tools > Triggers > Contact List Trigger
- Click "Please Select"
- Select My Library:...
- Click New Contact List
Specify unique name based on offering cycle name, eg EndorseListECR2019
(this will reduce possibility of duplication)- Click Save (not Save Triggers, which closes the pop-up)
- Under External Data Reference select Embedded Data and enter "LoginID"
- Click "Add additional fields"
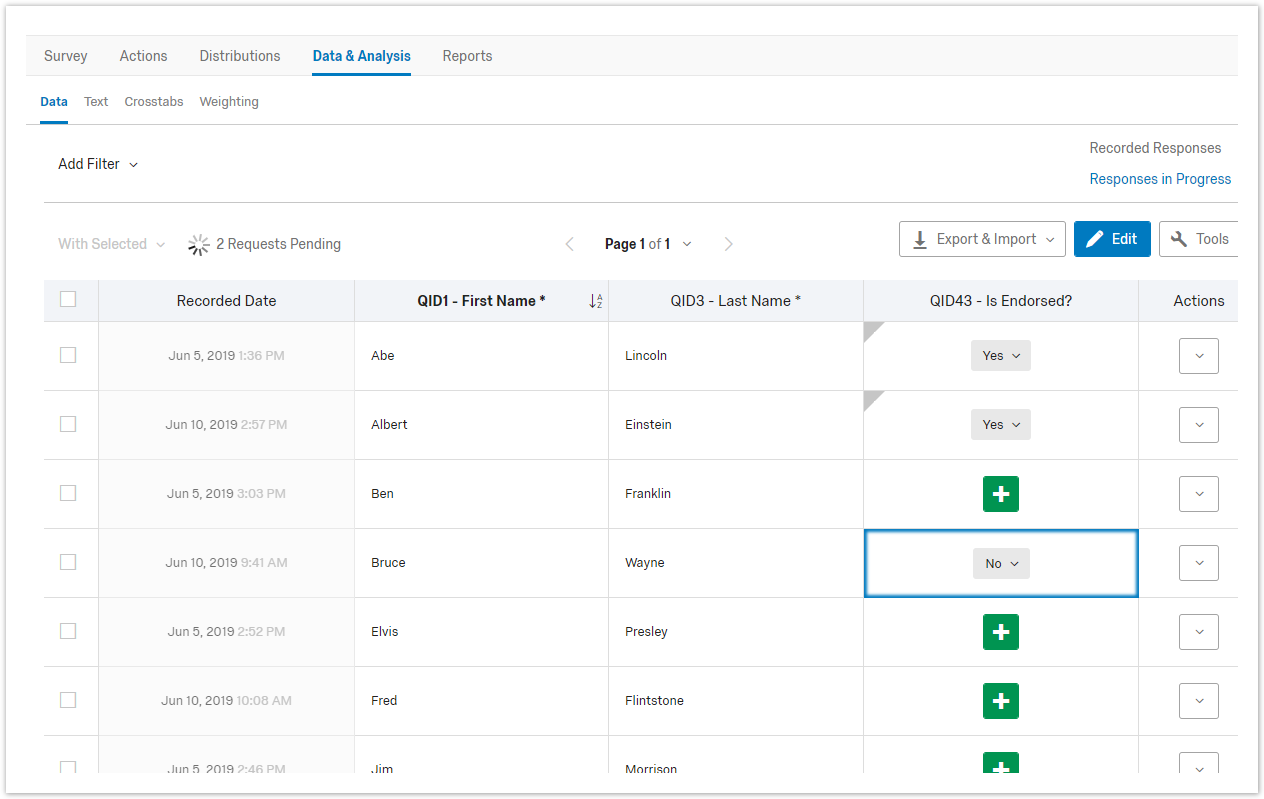
- Enter each field from the application survey that you want to display on the endorsement survey (Click + to add more fields) (first name, last name, email?)
- Set the value of each field with the "Select Question" and "Select Choice" drop downs
- Click Save Triggers
Note: to edit/view existing trigger details, click the name of the trigger, eg, "Add respondent to the panel..."
- Add email action to send a confirmation email to the applicant when the application survey is submitted.
- Click Actions > Add Action
- Event: Survey Response
- Conditions: N/A
- Tasks: Send Email
- To: from the dropdown, select Survey Question > Email > Email
- You can copy your departmental email address on messages. Separate 'To' emails with a comma. Each recipient will only see their own email address, so it acts as a BCC.
- Add a From Address, From Name, and Reply-To Address
- In the Subject field
- Type "Successful Application of (name of your offering cycle)"
- Add information to the Message field
- Pipe in the LoginID so they can reference it if they need to contact you.
- To: from the dropdown, select Survey Question > Email > Email
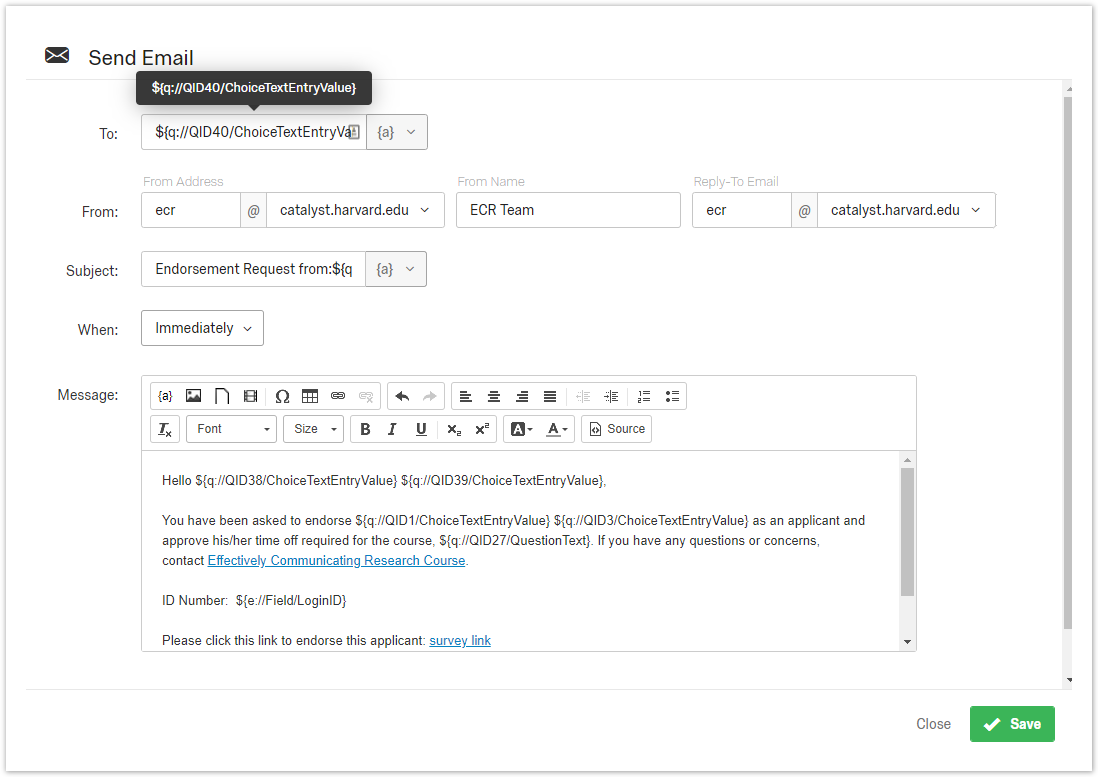
- Add email action to send an email to the endorser when the application survey is submitted.
- Click Actions > Add Action
- Event: Survey Response
- Conditions: N/A
- Tasks: Send Email
- To: from the dropdown, select Survey Question > Endorser Email > Endorser Email
- You can copy your departmental email address on messages. Separate 'To' emails with a comma. Each recipient will only see their own email address, so it acts as a BCC.
- Add a From Address, From Name, and Reply-To Address
- In the Subject field
- Type "Endorsement request from " (note the space after "request from ")
- From the {a} dropdown select "Survey Question" > [endorser_name]
- Add instructions to the Message field
- Instructions for the endorsement process
- Pipe in LoginID, applicant first/last, your contact information, etc.
- If you would like to collect the endorser's response using email you are done with the Applicant survey and can begin testing. Make sure to use your own email address when submitting forms to review email templates as well as all surveys and flows.
- To: from the dropdown, select Survey Question > Endorser Email > Endorser Email
OR
- If you would like to collect the endorser's response using a Qualtrics survey, you will need to come back to this email action once you've completed the endorser survey.
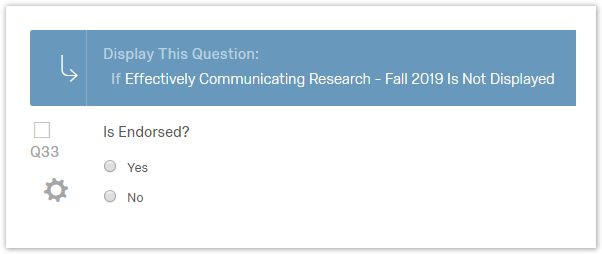
Endorser survey (optional; you can alternatively accept endorsements via email)
- Click "Create Project"
- Create questions and add any preferred logic.
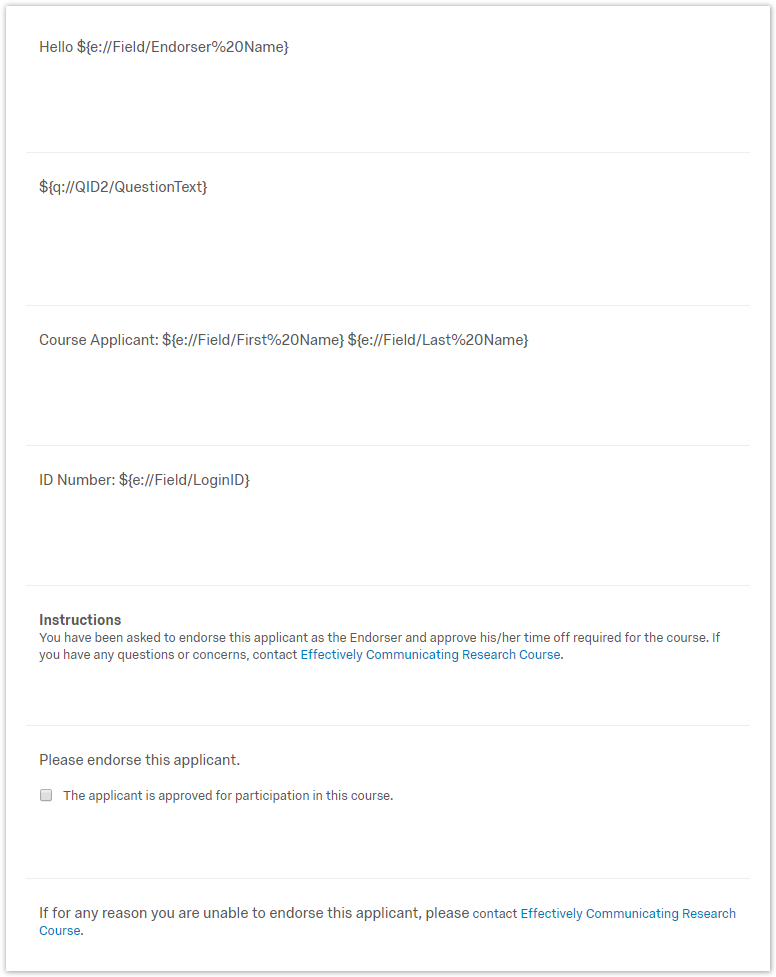
- Add a question of type Text/Graphic to display applicant data
- Add instructions to endorser
- Add a placeholder for each field that you want to display (e.g. applicant first and last name)
- Add a question of type Text/Graphic to display applicant data
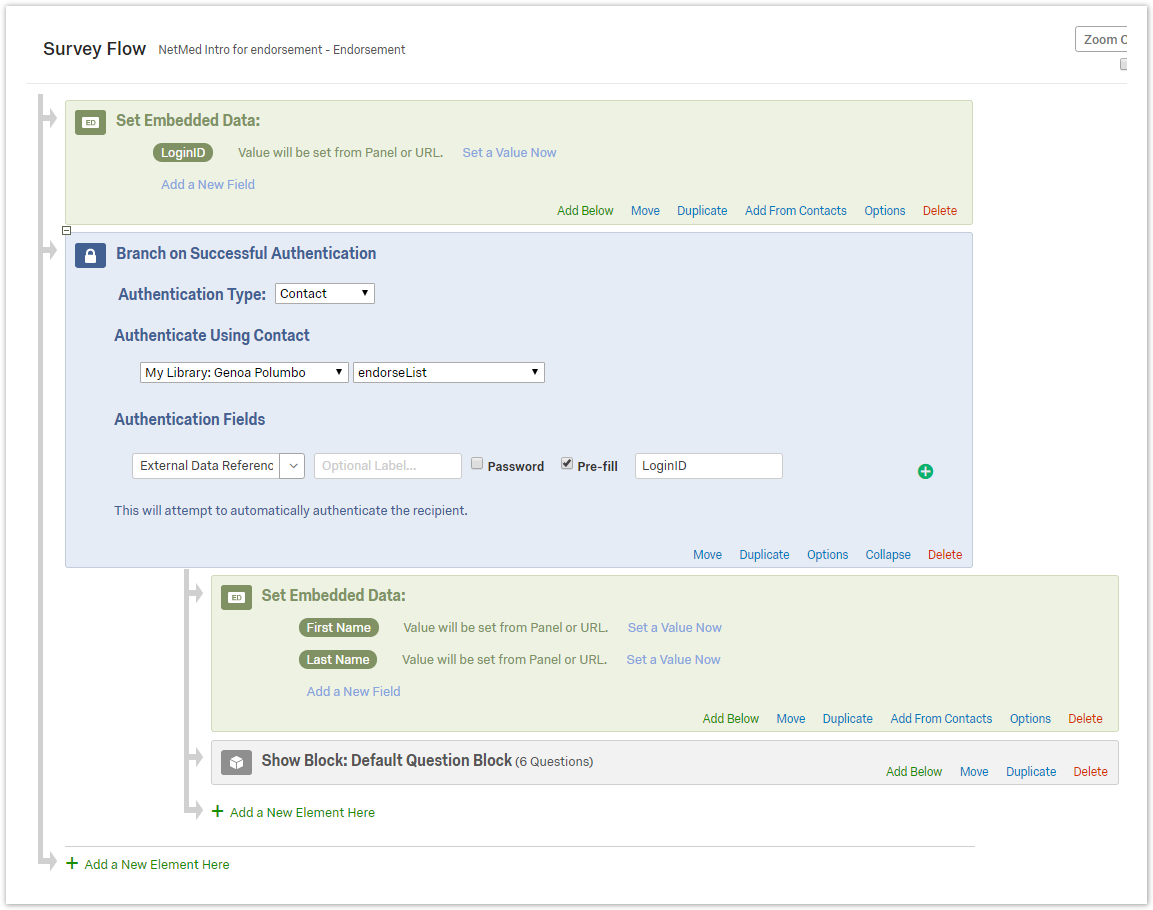
- Click Survey Flow
- Click Add a New Element Here and select Authenticator
- Authentication Type: Contact
- Authenticate Using Contact: (select "EndorseListECR2019" or whatever contact list name you used in the Application survey)
- Authentication Fields: External Data Reference; check "Pre-fill"; type "LoginID"
- Move the Authenticator Block above Question Block
- Click Add a New Data Element Here and click Embedded Data
- Type "LoginID"
- Move above all other blocks
- Click Add a New Data Element Here and click Embedded Data
- Add each element that you want to reference from the Applicant survey (e.g. applicant first and last name)
- Type the field name, i.e. Applicant First Name (Make sure the field names match)
- Move this block below Authenticator and above the question block
- Click Save Flow
- Add Applicant data to the placeholder questions
- Click the question text to edit
- Select Piped Text > Embedded Data Field > from dropdown, select Applicant First Name, Applicant Last Name, etc.
- Customize the Endorser email
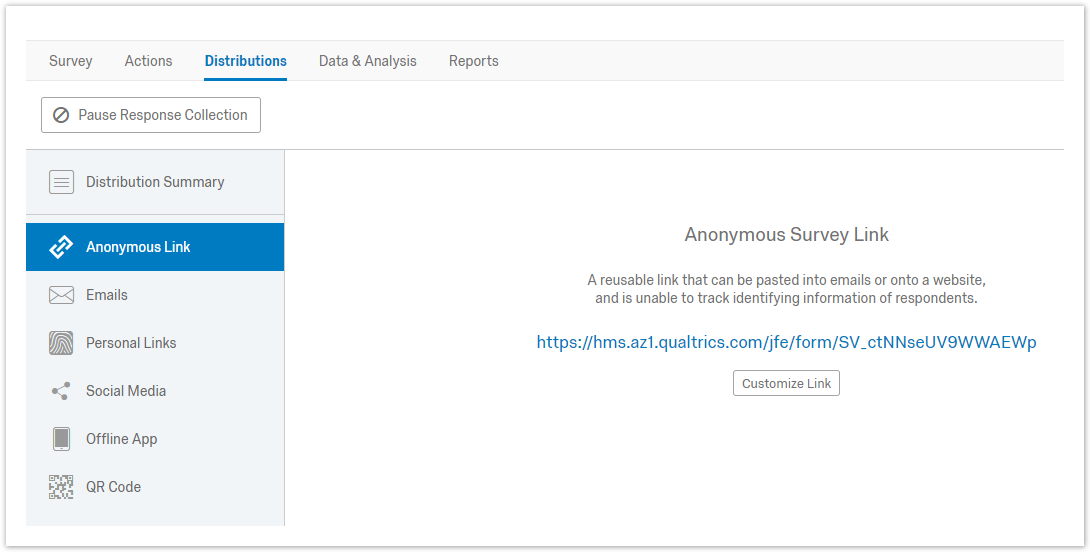
- Copy the Anonymous Link of the Endorser Survey
- Click Distributions
- Click Get Reusable Link (if visible) or click "Anonymous Link"
- Copy the Anonymous Survey Link
- Copy the Anonymous Link of the Endorser Survey
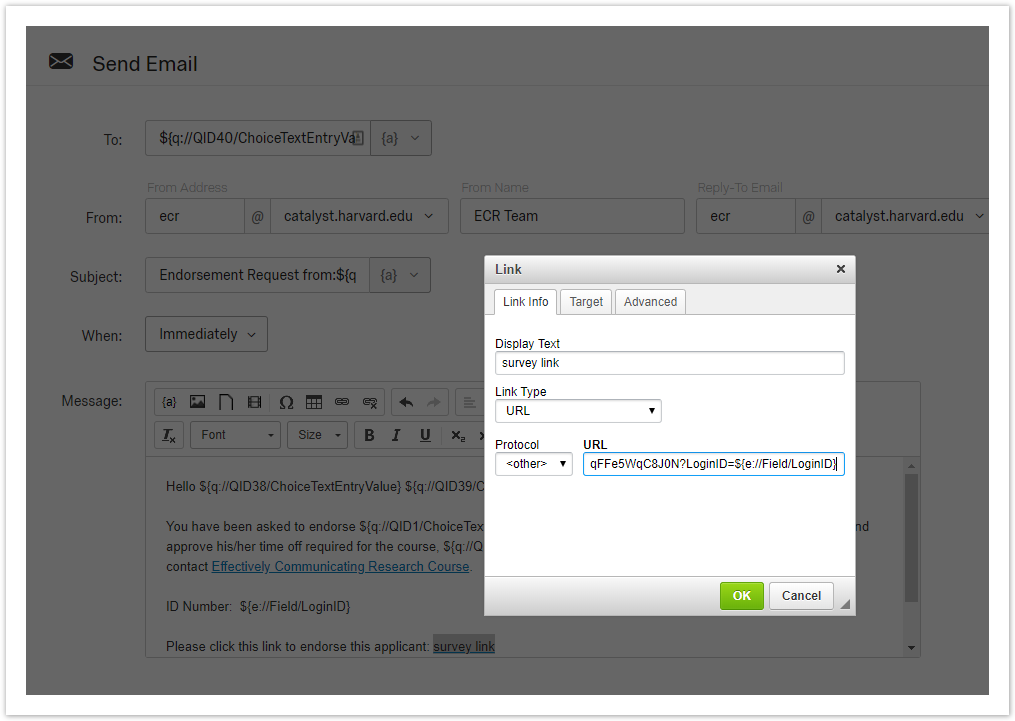
- Paste the Anonymous Link to the Endorser Survey into the Endorser email (within the application survey)
- Append anonymous link URL with ?LoginID=${e://Field/LoginID}
- Be sure to take a look at the Survey Options to make sure it is set up properly (specifically, make sure Open Access is selected)
- You are ready to test. Fill out the applicant survey and include your own email as the endorser. Once you receive the endorsement request email, complete that survey