Page History
...
One drawback when using the above approach is that a web browser attempting to access a shrine host whose certificates have been configured this way will generate a warning. The reason for the warning is that, by default, the browser does not trust the CA that is used to generate the downstream certificate, because none of the ACT CAs are public. Consequently, any certificate that the CA signs is not trusted by the browser. While the browser can be configured to ignore the warning and the CA can be manually imported into the browser's trust store, some downstream sites may opt for a more elegant approach.
So, a solution for this is to utilize a commercial SSL cert to serve the SHRINE application through Tomcat. You will need to create a CSR from your existing shrine.keystore to send to the commercial provider to get a SSL cert back. For example, ComodoSSL will send back 4 certificates (after sending them the CSR):
- AddTrustExternalCARoot.crt
- SectigoRSADomainValidationSecureServerCA.crt
- USERTrustRSAAddTrustCA.crt
- acttest_harvardshrine_net.crt
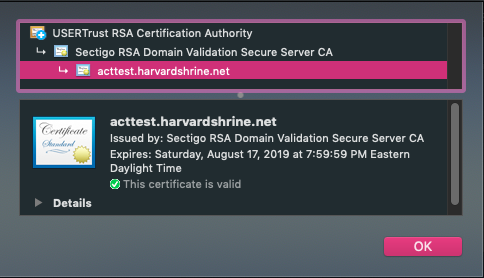
First, you'll need to bundle up the certs into a chained cert. It's important to add these certs in the correct order, which you can discern from getting the details from each cert. Each cert will refer to the next level cert. Typically, you'll be adding the domain cert + intermediate 2 + intermediate 1 + root.
| Code Block | ||||
|---|---|---|---|---|
| ||||
cat acttest_harvardshrine_net.crt SectigoRSADomainValidationSecureServerCA.crt USERTrustRSAAddTrustCA.crt AddTrustExternalCARoot.crt > chain.crt |
Indeed, the option of using a third-party-signed certificate provides a more seamless user experience in the web browser, because the root and intermediate CAs are already trusted by the browser.
This wiki page describes the process of using a third-party-signed certificate for the purpose of encrypting web browser traffic. It is important to note that a third-party certificate does not replace the ACT-signed certificate entirely, because the ACT certificate is still required for signing all application-specific messages. Also, this wiki does not attempt to cover any vendor-specific processes or output files, because those can vary. It is up to each remote site that chooses this option to work with its vendor on any necessary technical details.
The first step is to generate a certificate signing request (CSR) using a private key, and to send that CSR to an SSL/TLS vendor. The vendor will in turn provide a certificate for the requested fully-qualified domain name (FQDN), and it may provide additional certificates for its root and intermediate CAs. The remote site should work with the vendor to concatenate all certificates together into one file, such that it would be possible to trace the chain of trust from the endpoint certificate all the way back to the root CA.
The next step is to extract the private key that was used to generate the CSR. If a utility such as openssl was used to generate the CSR, then a file containing the private key should already be present and this step is unnecessary. If, however, the site used keytool to generate the CSR, then the following command should be run to extract the private key into a separate file. Execute the following command to extract the private key into a file called private_key.pemAfter you have created the chained cert, you will now need to extract the private key from the shrine.keystore that you had initially created:
| Code Block | ||||
|---|---|---|---|---|
| ||||
$ openssl pkcs12 -in shrine.keystore -nodes -nocerts -out private_key.pem |
Keep this private key safe in a secure directory!
...
| title | For generated private keys |
|---|
...
This private key should be guarded carefully. Ideal places include an encrypted disk volume and non-persistent, RAM-based disk (such as /dev/shm in CentOS or Debian).
Next, once you have the private key, you'll need to combine the chained cert and the private key into a PKCS12 package (.pfx) in order to import back into the shrine.keystore:
...
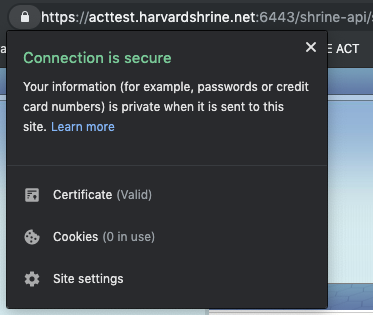
Once that change is made, you will need to restart Tomcat services. Once things are back up, you should see a valid certificate ("lock") when you navigate to the SHRINE application:
Overview
Content Tools