Page History
| Note |
|---|
These instructions have been updated recently and verified to the best of our ability. Please be aware there may be typos, ambiguities and other errors. If you find any errors, please let us know. |
| Tip | ||
|---|---|---|
| ||
If you are having trouble with the installation, please take a look at our troubleshooting page. |
Introduction
This document details the procedure for creating an eagle-i institutional node as a virtual server (or instance) in the Amazon Elastic Compute Cloud (or EC2). Once created, the eagle-i node will operate entirely in the cloud. However, you will retain administrative responsibility over its operation and maintenance, and in particular, you will be responsible for running upgrade scripts when new eagle-i software is released. We do not expect these tasks to be complex, though basic Unix skills are desirable. This solution is ideal for institutions that want to evaluate eagle-i or participate in the eagle-i network but do not have easy access to a data center service. Naturally, the AWS service will incur operational costs (for pricing details
...
, consult the AWS website).
The installation procedure is simple and does not require specialized technical skills. It will allow you to get an eagle-i node up and running in a short amount of time. For a production system, you may need to involve your IT department, in a limited way.
...
A new AMI will be available for subsequent releases, likely with a slight delay after the release.
| Panel |
|---|
What this is: |
...
a mechanism for instantiating an eagle-i node in the Amazon Cloud |
...
|
First time installation
Getting ready
This procedure can be used to create an evaluation/development or a production eagle-i node:
...
| Status | ||
|---|---|---|
|
...
| Status | ||||
|---|---|---|---|---|
|
...
1. Getting ready
2. Installation Procedures
| Warning |
|---|
Note that an evaluation or development node cannot be converted to a production node. |
As a pre-prerequisite, you will need to decide which type of installation you will need, evaluation/development or production eagle-i node.
Prerequisites
| Info | ||||||
|---|---|---|---|---|---|---|
You may need to involve your IT department to obtain the first 2 prerequisites for a |
Public host name
may use the amazon-generated public hostnameStatus title evaluation/development node
will need to have a DNS record once you obtain an IP address from EC2Status colour Blue title production node - Decide on a good host name. It will determine the namespace of your Linked Open Data, and it shouldn't be changed once data exists in production.
- Examples of existing host names: harvard.eagle-i.net, eagle-i.ea.vanderbilt.edu
- An SSL Certificate
may use the self-signed certificate provided by the AMIStatus title evaluation/development node
needs an X509 certificate in PEM formatStatus colour Blue title production node
- A browser (in our experience Firefox works best; in Chrome, the scrollbars in AWS dialogues are finicky)
- An Amazon Web Services (AWS) account with the Amazon Elastic Compute Cloud (EC2) service enabled
- Sign up for AWS
- Sign up for the EC2 service; this will require that you provide credit card information.
- An SSH client for remotely logging in to the EC2 instance
- If you're using Linux, you know what this is about already
- In MacOSX you can simply use the Terminal application that is installed by default (look in your Applications folder, under Utilities)
- In Windows we recommend downloading and installing PuTTY (a remote login client that can handle SSH keys) or cygwin (a full Unix toolset)
| Tip |
|---|
Throughout this procedure, you will be using the AWS Management Console, and in particular the EC2 Dashboard and the Cloud Formation Dashboard. You may want to familiarize yourself with the console and bookmark it: https://console.aws.amazon.com |
Installation procedure
1. Allocate EC2 Resources
| Note |
|---|
Please note that all the EC2 resources described below need to be allocated in the same availability zone |
1.1 Select a US availability zone/geographic region
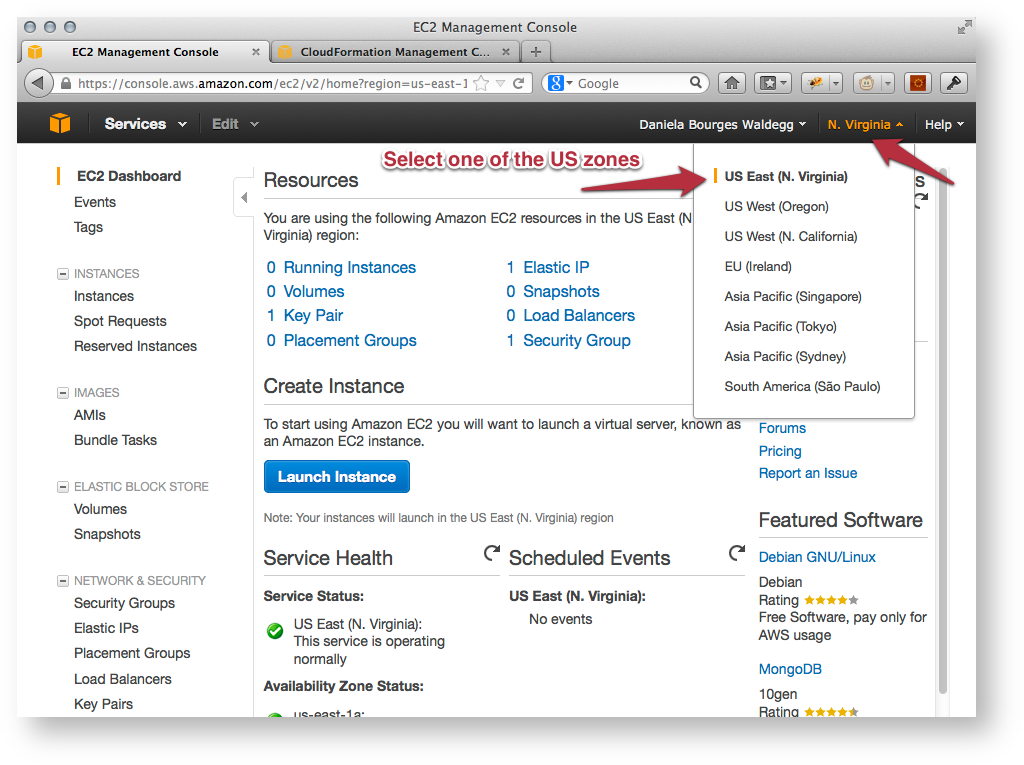
Amazon allocates EC2 resources (IP addresses, virtual hardware) in specific facilities that are meant to cover different geographic regions (also called availability zones). We support three zones: US East (N. Virginia), US West (Oregon) and US West (N. California).
- Go to your EC2 Dashboard
- Using the pull down list at the top right hand corner of the dashboard (next to your user name); choose that which is most appropriate to your institution's location.
...
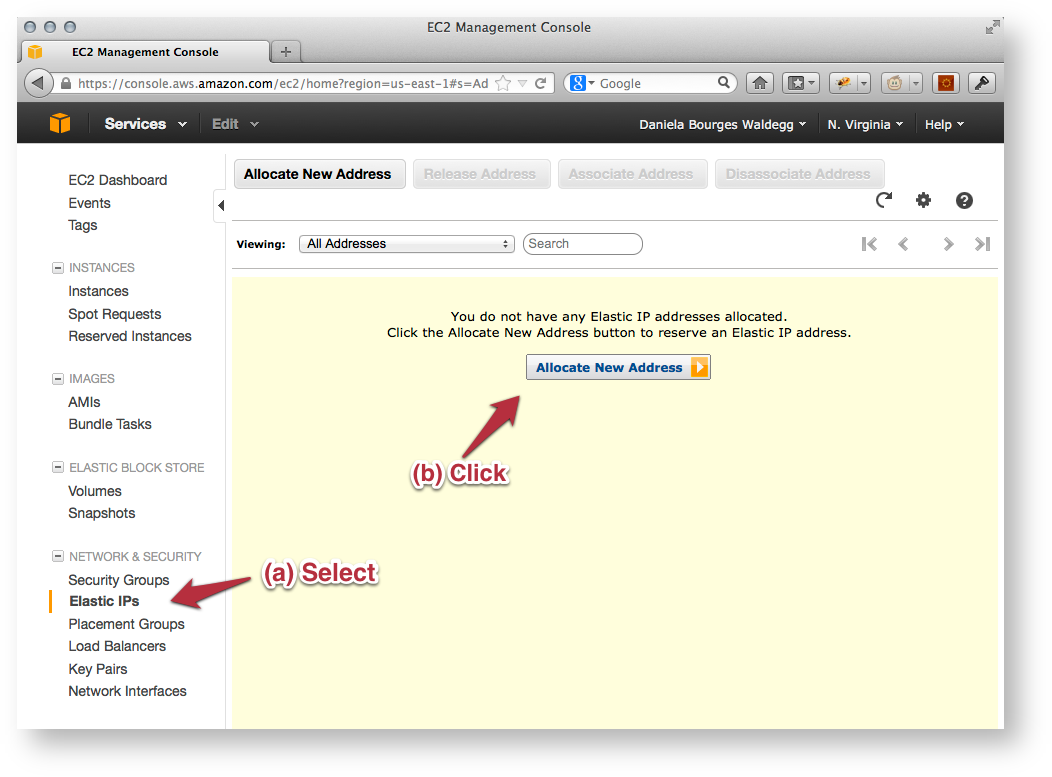
- Go to your EC2 Dashboard
- In the left navigation bar, open the Network and Security section
- Select Elastic IPs
- Click on the Allocate New Address button
- Accept the default in the dialogue box (create in EC2) and allocate.
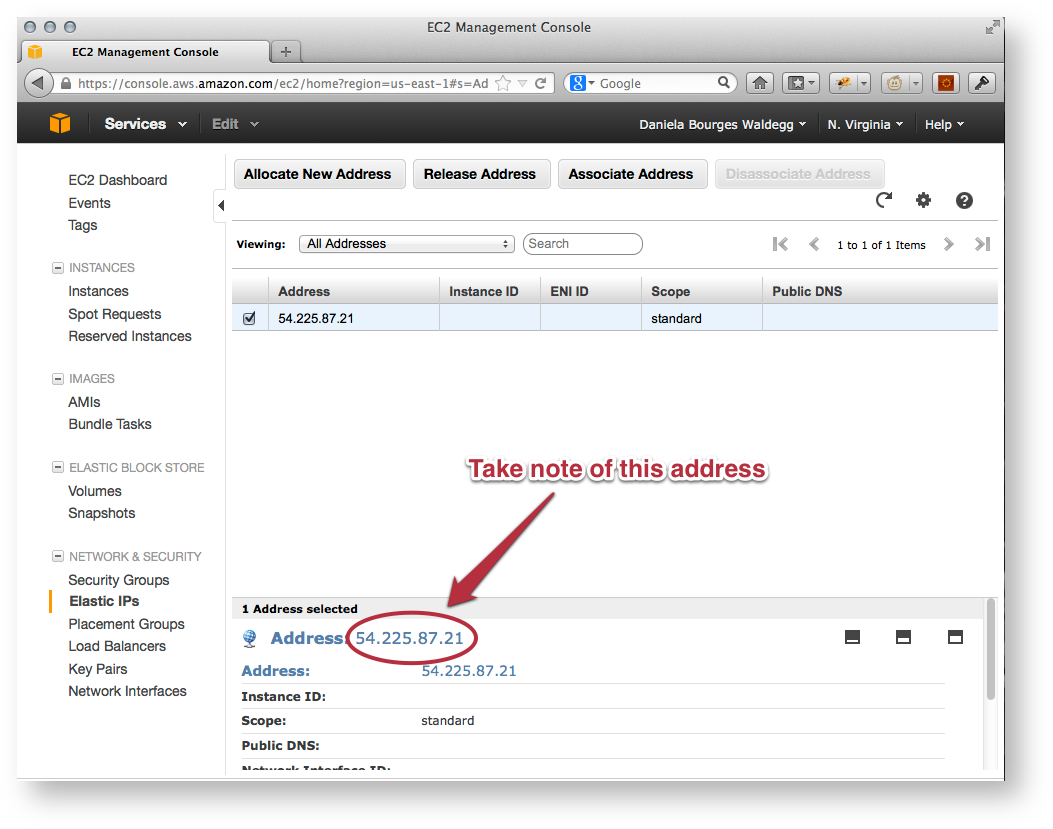
- Take note of the new IP address, you will need it in step 2.
| Warning | ||||||
|---|---|---|---|---|---|---|
If you are installing a |
...
For more detailed information on creating and using a key pair with your EC2 instances, please see AWS Documentation: EC2 Key Pairs
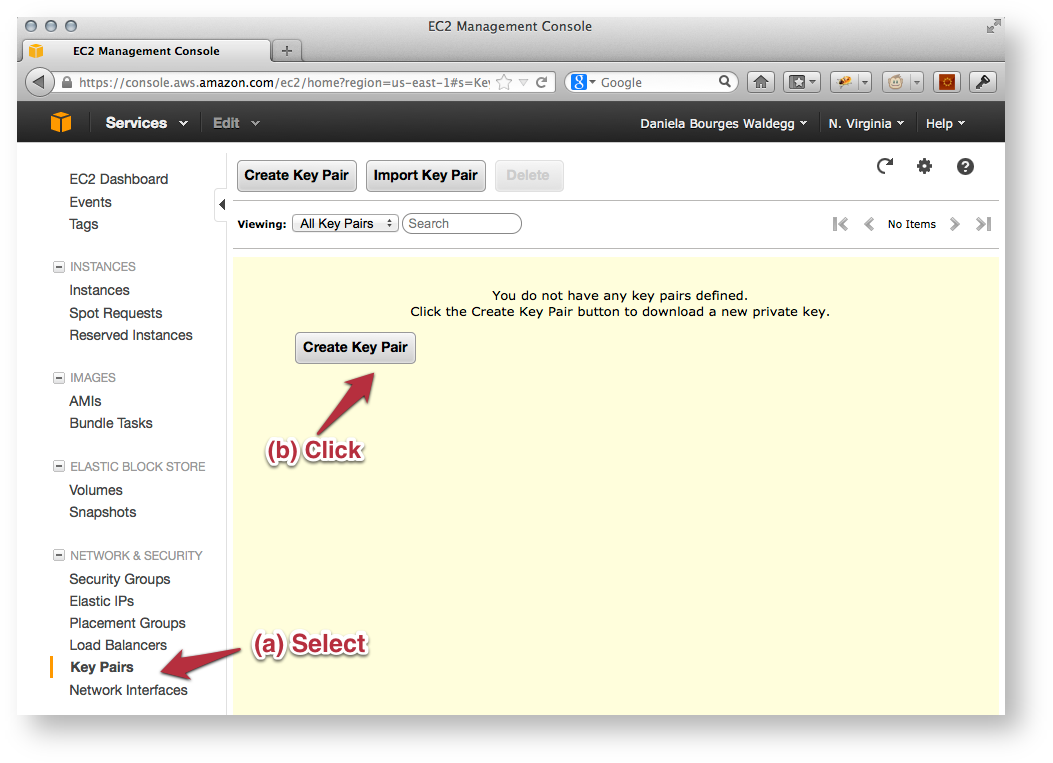
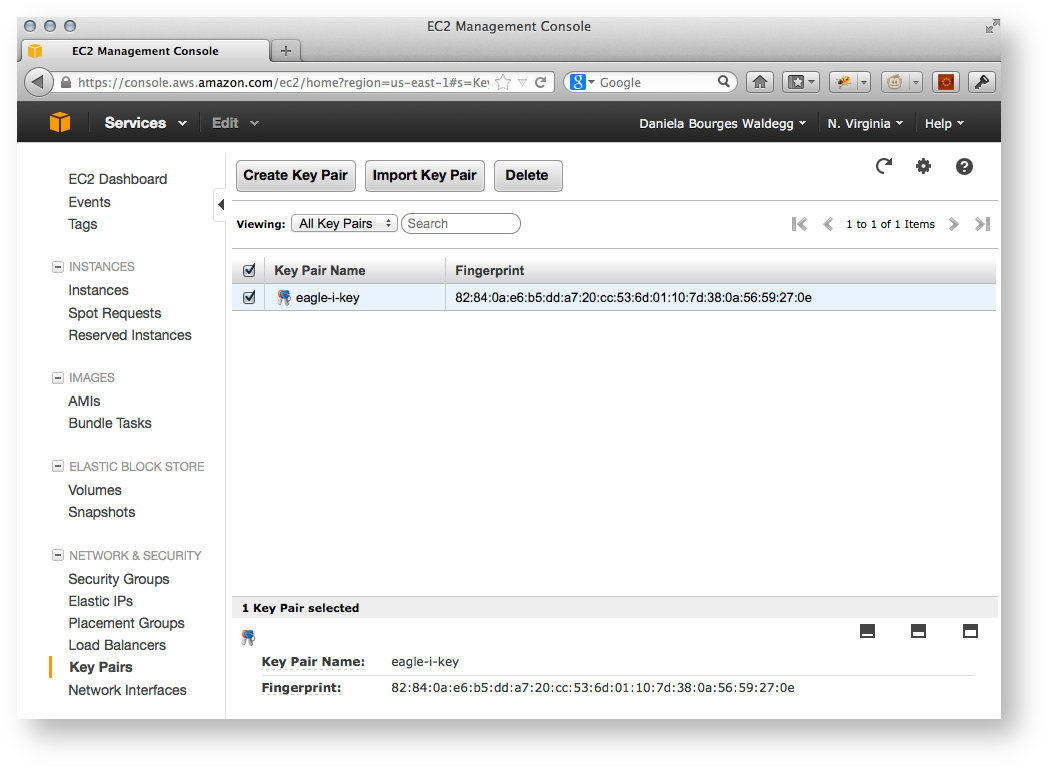
- Go to your EC2 Dashboard.
- In the left navigation bar, open the Network and Security section.
- Select Key Pairs.
- Click on the Create Key Pair button.
- Enter a name for your key pair (e.g. eagle-i-key) and select create.
- Your private key will be downloaded to your computer, as a file with the name you specified and the
.pemextension (you may be prompted by your browser to select a location). Store it in a dedicated directory to which you will come back later, e.g./my-home/aws/keys
...
...
...
Before proceeding: if you are creating a
instance, make sure that your public hostname resolves to the elastic IP address created in 1.2. You can use an online service to check, for example: http://www.whatsmydns.net/Status colour Blue title production node
2.1 Launch Instance of the eagle-i AMI
For more detailed information on how to launch an EC2 Instance from an AMI, please see AWS Documentation: Launching an Instance.
...
Select the latest eagle-i AMI
...
| borderColor | Grey |
|---|---|
| title | Latest eagle-i AMI |
...
3.
...
...
Choose an Instance Type that is appropriate for your installation. For the available instance types as of August 2016, we recommend:
t2.microStatus title evaluation/development node
m3.mediumStatus colour Blue title production node
...
2.2 Wait for Instance to complete initialization
For more detailed information about the instance lifecycle, please see AWS Documentation: EC2 Instance Lifecycle.
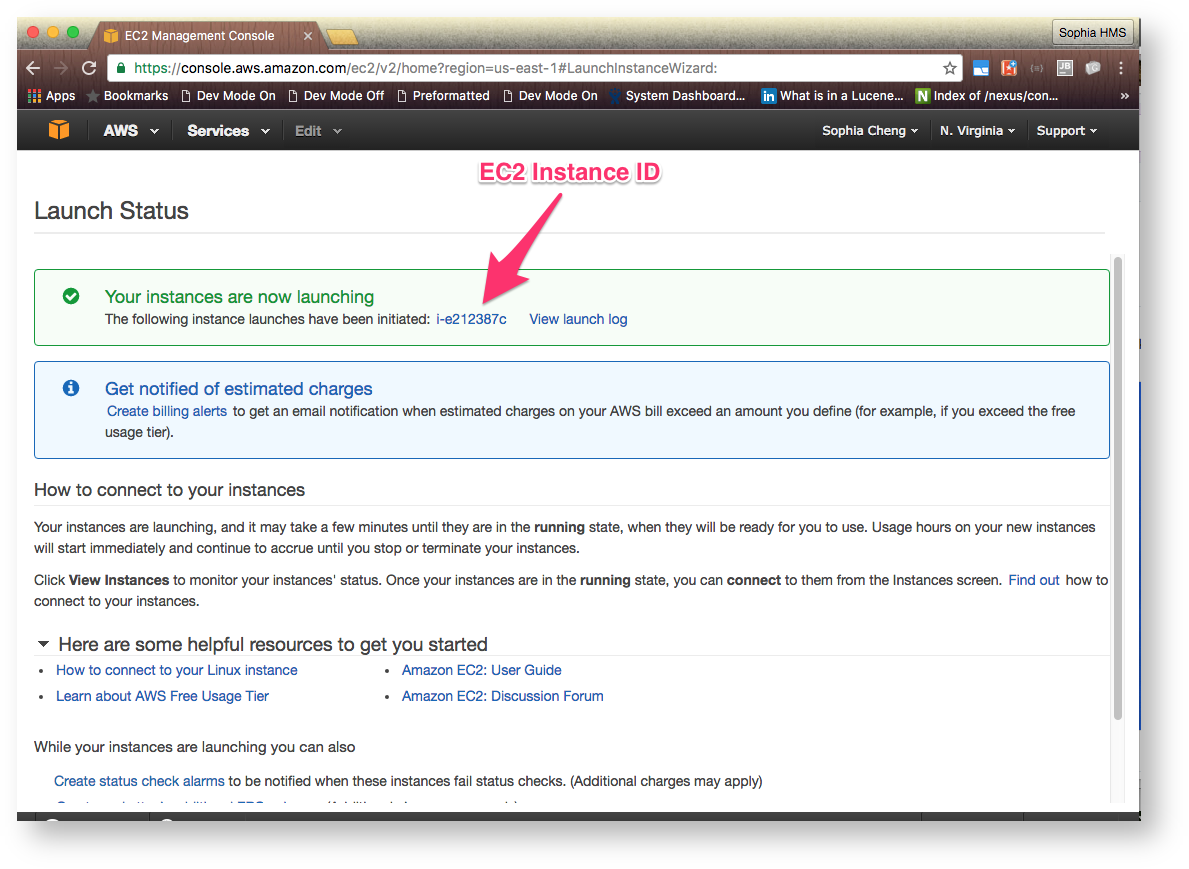
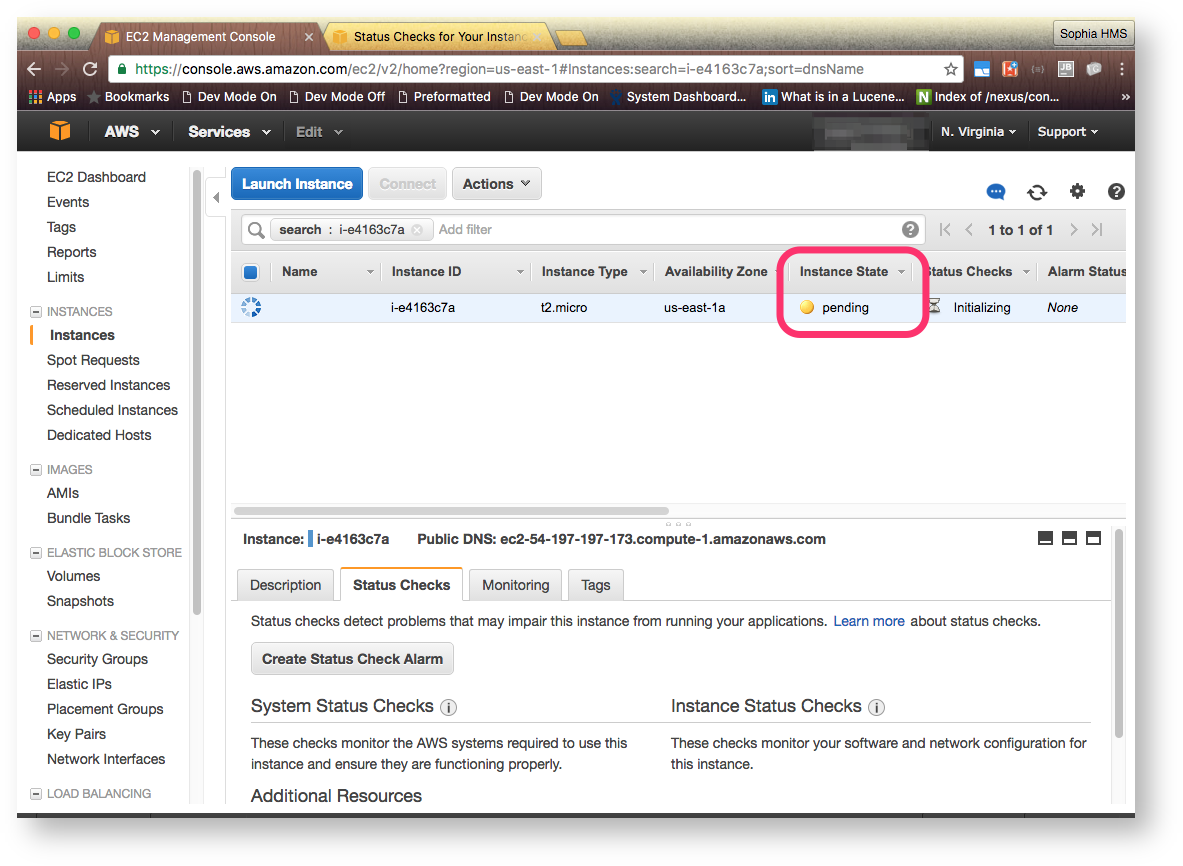
- Go to the Instances view by doing either:
- Click on the EC2 Instance ID in the Launch Status page
- Go to your EC2 Dashboard and click on Running Instances
- Wait for the Instance State to go from Pending to Running
...
Customize eagle-i node
| Tip | ||
|---|---|---|
| ||
For an evaluation node, there is no need to customize the installation any further. |
...
Using the public DNS (Create an eagle-i node -> Wait for Instance to complete initialization) as your hostname, you may now go to a browser and navigate to the eagle-i node to begin entering data, searching data, accessing the repository, etc. |
...
...
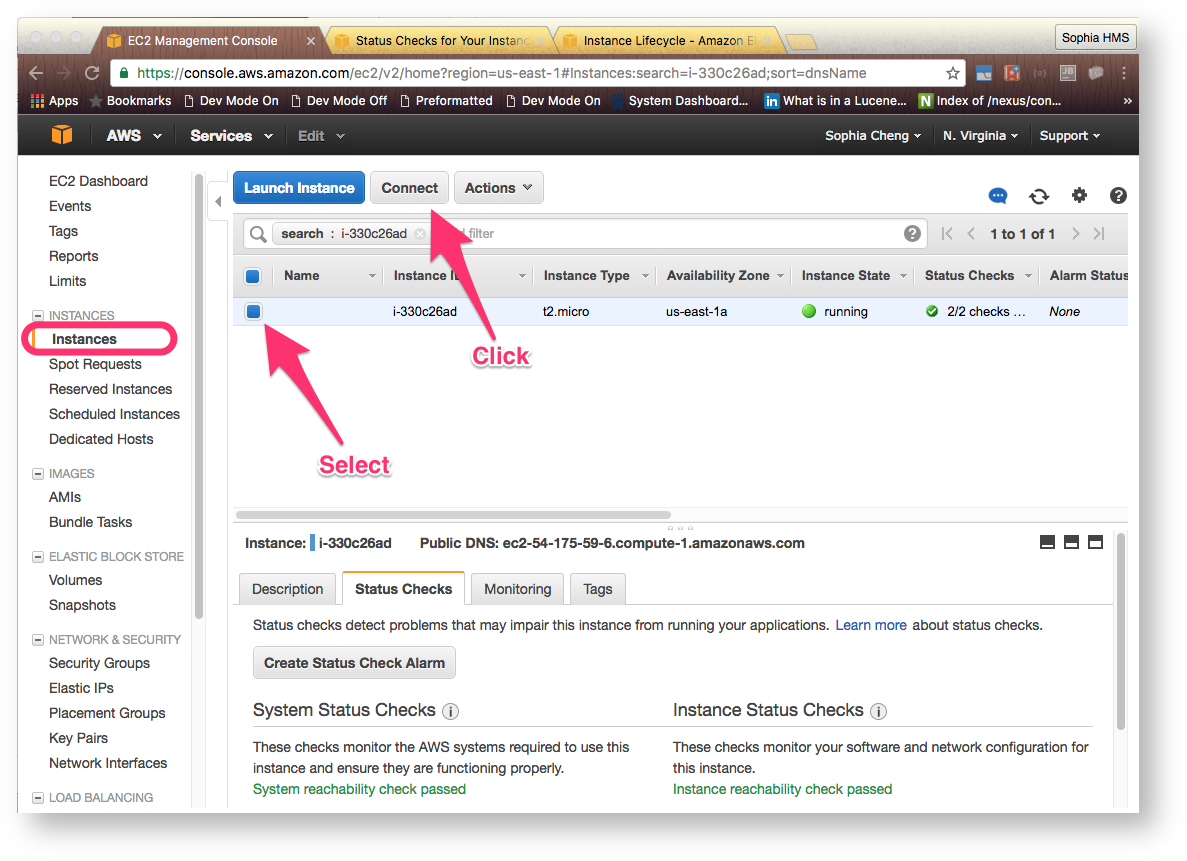
- Go to your EC2 Dashboard.
- Click on Running Instances
- Select the newly created EC2 Instance
- Click on the Connect button and follow the instructions to SSH to the node
3.2 Stop the running tomcat instance
In the SSH terminal, go to the tomcat directory -
cd /opt/apache-tomcat-7.0.39/Stop tomcat using the shutdown script -
sudo -su tomcat bin/shutdown.shVerify tomcat has been shutdown -
ps aux | grep tomcat
| Code Block | ||||||||
|---|---|---|---|---|---|---|---|---|
| ||||||||
[root@ip-172-31-54-208 log]# cd /opt/apache-tomcat-7.0.39/
[root@ip-172-31-54-208 apache-tomcat-7.0.39]# sudo -su tomcat bin/shutdown.sh
Using CATALINA_BASE:   /opt/apache-tomcat-7.0.39
Using CATALINA_HOME:   /opt/apache-tomcat-7.0.39
Using CATALINA_TMPDIR: /opt/apache-tomcat-7.0.39/temp
Using JRE_HOME:        /opt/jdk1.8.0_66
Using CLASSPATH:       /opt/apache-tomcat-7.0.39/bin/bootstrap.jar:/opt/apache-tomcat-7.0.39/bin/tomcat-juli.jar
[root@ip-172-31-54-208 apache-tomcat-7.0.39]# ps aux | grep tomcat
root      1646  0.0  0.0 103312   876 pts/0    S+   13:02   0:00 grep tomcat

#### The following means that tomcat is still running ####
tomcat 1674 93.2 11.4 3599164 116800 pts/0 Sl 13:08 0:03 /opt/jdk1.8.0_66/bin/java -Djava.util.logging.config.file=/opt/apache-tomcat-7.0.39/conf/logging.properties -Djava.util.logging.manager=org.apache.juli.ClassLoaderLogManager -Xmx1536m -XX:+PrintGCDetails -Xloggc:/opt/apache-tomcat-7.0.39/logs/tomcat-gc.log -Djava.endorsed.dirs=/opt/apache-tomcat-7.0.39/endorsed -classpath /opt/apache-tomcat-7.0.39/bin/bootstrap.jar:/opt/apache-tomcat-7.0.39/bin/tomcat-juli.jar -Dcatalina.base=/opt/apache-tomcat-7.0.39 -Dcatalina.home=/opt/apache-tomcat-7.0.39 -Djava.io.tmpdir=/opt/apache-tomcat-7.0.39/temp org.apache.catalina.startup.Bootstrap start |
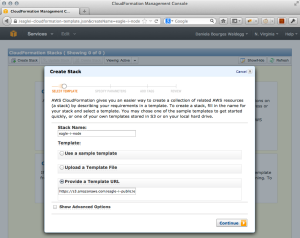
Open the Cloud Formation Dialogue Window (by clicking here). It should look like this:
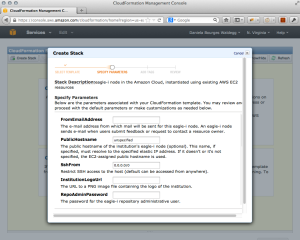
Click continue to accept the defaults. The next window will provide entry fields for a few parameters necessary to configure the EC2 instance and the eagle-i software. They are described below, in alphabetical order. NB Unfortunately, we cannot control the order in which these parameters are presented in the Cloud Formation window, so the list below will not necessarily match the order you see.
Eip
An existing EC2 elastic IP address to be associated with the new instance.
Enter the IP address you created in 1.1FromEmailAddress
The e-mail address from which mail will be sent for this eagle-i node. An eagle-i node sends e-mail when users submit feedback or request to contact a resource owner.
Example: eagle-i-postmaster@miskatonic.eduGoogleAnalyticsId
A Google Analytics ID to monitor the eagle-i node (optional). Must be a valid Google Analytics ID of the form UA-XXXXX-YY.
Note: it is possible to modify the configuration later on to add this parameter, see the Maintenance Tasks section. However, this requires some Unix skills.InstanceType
Amazon EC2 instance type, choose either m1.medium or m1.large.
Default: m1.medium
Note: pricing differs; a medium instance should be enough as a starting point, see http://aws.amazon.com/ec2/instance-types/InstitutionLabel
The display name of the institution
Example: Miskatonic UniversityInstitutionLogoUrl
The URL to a PNG image file containing the logo of the institution
Example:http://miskatonic.edu/logo.pngKeyName
Name of your EC2 key pair. This will enable SSH access to the new instance.
Enter the name of the key pair you created in 1.2PublicHostname
The public hostname of the institution's eagle-i node. This name must resolve to the specified elastic IP address.
Default: unspecified
Example: eagle-i.miskatonic.edu
Note: If you use the default value, the instance will be configured with the default EC2 public hostname (recommended for evaluation and development instances only).RepoAdminUserName
The name of the eagle-i repository administrative user. It must contain only alphanumeric characters and be between 6 and 12 characters long.RepoAdminPassword
The password for the eagle-i repository administrative user. Must contain only alphanumeric characters and be between 6 and 12 characters longSshFrom
Restrict SSH access to the host.
Default: 0.0.0.0 = the instance can be accessed from anywhere (this is usually fine)ToEmailAddress
The default e-mail address to which mail will be sent for this eagle-i node. This address will receive feedback submitted by users via the eaglei UI, or requests for resources that have no contact information.
Example: eagle-i@miskatonic.eduWebFrom
Restrict HTTP/HTTPS access to the host.
Default: 0.0.0.0 = the instance can be accessed from anywhere (this is usually fine)
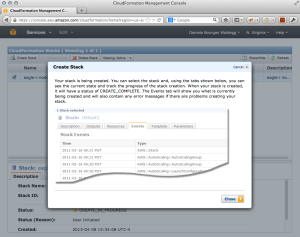
Once you have entered values for all these parameters, click continue and skip the following dialogue window (Add Tags) by clicking continue again. If any of the parameter values is invalid, a red error message will appear, at the bottom of the dialogue window. If this is the case, return to the parameter screen and enter a valid value. Once all your parameters validate, you will be presented with a summary of the information you provided. If the information is correct, click continue. A screen indicating the stack creation is in progress will appear:
You may close the Cloud Formation dialogue window.
2.2. Monitor stack creation
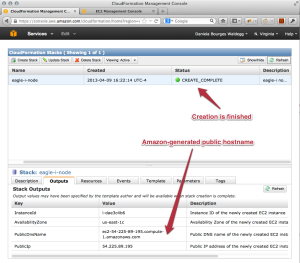
Monitor the progress of your stack creation in the Cloud Formation dashboard -- detailed progress will be shown in the Events tab (hit refresh to get updated views). Once the stack is created, its status will be CREATE_COMPLETE.
At this point you have an EC2 instance that is in the process of booting.
If you are installing an evaluation or development instance, take note of the public hostname that was dynamically assigned. You will find this in the Outputs tab of the Cloud Formation Dashboard, in the PublicDnsName row. The name will be in the amazonws.com domain, for example: ec2-54-225-140-48.compute-1.amazonaws.com. Note how ugly this name is, which is why we do not recommend it for a production system - it would need to be typed by your users and it would appear in your Linked Open Data.
You will be able to manage your EC2 instance from the EC2 Dashboard. In the left navigation bar, open the Instances section and select Instances. You will see one row with your instance information. Check the box on the left and click on the Actions button to obtain a menu of possible actions.
...
As soon as the EC2 instance boots, the eagle-i installation process automatically starts. It takes care of downloading, installing and configuring eagle-i prerequisites (Java, Tomcat, Postfix) and eagle-i software. When this process completes, which will take a little while, you will have an eagle-i node up and running.
If you would like to monitor the progress of this step, start an SSH session with your newly created instance (see Appendix 1). Otherwise, get a coffee and skip the rest of this section.
From your SSH terminal, issue the following command:
| Code Block | ||
|---|---|---|
| ||
tail -f /var/log/bootstrap.log
|
You will see the current progress of the installation procedure. You will see the message bootstrap.sh: finished when the procedure completes.
is up and running for more information on where to navigate to. |
- Prepare to Customize eagle-i Node
- Customize eagle-i Repository
- Create system users
- Customize public SPARQL endpoint
- Update node configuration file
4. Verify installation
...
- The landing page for your new eagle-i node should now be accessible from a browser, e.g.:
https://eagle-i.miskatonic.edu - You should be able to log in to the eagle-i repository admin console, using the repository credentials specified at stack creation time, e.g.:
https://eagle-i.miskatonic.edu/repository/admin
You may want to create users with different roles and in general poke around the different configuration options. - You should have access to the SWEET, e.g.:
https://eagle-i.miskatonic.edu/sweet - You should have access to the institutional search, e.g.:
https://eagle-i.miskatonic.edu/institution
Log in with one of the users you created and verify you can access the SWEET workbench, create a test organization and publish it, verify it appears in search after being published, etc. You may want to compare your screens with our training node: https://training.eagle-i.net/sweet and https://training.eagle-i.net/institution
4. Troubleshooting
If your EC2 instance is successfully created, but your eagle-i node does not come up, SSH into your instance and look for error messages in the log (follow instructions in section 2.3. Monitor eagle-i installation). Some common errors are listed below. If you hit an error that is not listed yet, please let us know.
4.1. Hostname does not resolve to elastic IP address
If you are installing a production environment and your hostname, at the time of installation, did not resolve to your elastic IP address, you will see a message like the following:
| Code Block | ||
|---|---|---|
| ||
FAILED: user-specified hostname 'eagle-i.miskatonic.edu' doesn't resolve to ip address '54.225.67.81'
|
To get past this error:
Double check with your DNS administrator that the correct information was used. DNS changes may take time to propagate, so make sure your hostname resolves within the EC2 environment by SSHing into your instance and issuing the
hostcommand. The answer should indicate that the host has your IP address, for example:Code Block language none host eagle-i.miskatonic.edu eagle-i.miskatonic.edu has address 54.225.67.81However, if there is not answer, the DNS mapping has not yet propagated and you will need to wait a bit longer.
- Once your hostname resolves correctly, restart your EC2 instance: go to your EC2 Dashboard, open the Instances section in the left navigation bar and select Instances. You will see one row with your instance information. Check the box on the left and click on the Actions button to obtain a menu of possible actions. Select Actions -> Reboot and wait until the state changes to Running (you may need to refresh the console).
- Follow the instructions in section 2.3. Monitor eagle-i installation to verify that your installation proceeds..
4.2. Connectivity issues
The eagle-i bootstrapping script that runs when the EC2 instance starts downloads all the files it needs from open.med.harvard.edu. If for some reason the download server cannot be reached, you will see an error message in the logs, for example:
| Code Block | ||
|---|---|---|
| ||
bootstrap.sh: checkout eaglei-ansible repository
svn: PROPFIND of '/svn/eagle-i-install/!svn/bln/217': could not connect to server (https://open.med.harvard.edu)
2013-04-17T17:22:56Z: bootstrap.sh: FAILED: error checking out eaglei-ansible repository: 1
|
This lack of connectivity is likely temporary. Wait a little while and reboot the EC2 instance to restart the bootstrapping procedure (see the Maintenance Tasks section for instructions on rebooting your instance).
5. Install your SSL certificate (production instance)
The install procedure above initially configures eagle-i with a self-signed certificate; this is acceptable for an evaluation or development environment, but not for a production instance. In order to finalize the installation of a production instance, please follow the steps below.
5.1. Transfer your certificate, certificate chain and private key to the EC2 instance
Obtain, from the person who purchased the certificate, the following files:
- The RSA key used at certificate purchase time and its password, e.g.
key.pem - The actual certificate returned by the certificate authority, e.g.
cert.crt - The certificate authority's (CA) certificate chain (depending on the particular CA, some of these may need to be downloaded - refer to their documentation), e.g.
ca.crt
You will need to copy these three files into your EC2 instance, to the directory /opt/eaglei/install
| Warning |
|---|
These files are security-sensitive. Please make sure they are transferred to you in a secure manner (e.g. a memory stick, or using the scp command) and delete them from your personal machine once they are installed. If in doubt, please ask for assistance of your IT department. |
5.1.1. With a terminal
For example, assuming the files are named as above and located in the directory /my-home/aws/cert, issue the following command in your terminal (substitute your own file names and public hostname):
| Code Block | ||
|---|---|---|
| ||
cd /my-home/aws/cert
scp -i /my-home/aws/keys/eagle-i-key.pem key.pem cert.crt ca.crt root@eagle-i.miskatonic.edu:/opt/eaglei/install/.
|
5.1.2. With PuTTY/PSCP
Follow the instructions in the section Transferring files with PSCP at the end of the AWS/PuTTY guide.
5.2. SSH into your EC2 instance and install the certificate
SSH into your EC2 instance, as described in Appendix 1.
In your SSH session, run the following commands (substitute the actual names of your files):
| Code Block | ||
|---|---|---|
| ||
cd /opt/eaglei/install
sh /bin/cert-install.sh -b ca.crt -c cert.crt -k key.pem
|
At the prompt, enter the key's password. When the script finishes, tomcat will restart. After restart, verify that your certificate is correctly installed by entering your public hostname in an online SSL validation service, such as http://www.geocerts.com/ssl_checker
Finally, remove the security-sensitive files used for installation, e.g.:
| Code Block | ||
|---|---|---|
| ||
rm ca.crt cert.crt key.pem
|
Upgrade Procedure
Your EC2 instance contains scripts to upgrade the eagle-i software upon new releases and patches. You will need to manually trigger this process, as follows:
- SSH into your EC2 instance, as described in Appendix 1.
- Execute the following commands:
| Code Block | ||
|---|---|---|
| ||
cd /opt/eaglei/install/ansible
source setup.sh && ansible-playbook -e "upgrade=true" install.yml
|
...
Your EC2 instance can be started and stopped from the EC2 Dashboard. In the left navigation bar, open the Instances section and select Instances. You will see one row with your instance information. Check the box on the left and click on the Actions button to obtain a menu of possible actions.
Most maintenance tasks require that you SSH into your EC2 instance, see Appendix 1.
1. Modify your eagle-i configuration
If you need to modify your eagle-i configuration (for example, to add a Google analytics ID) edit one or several of the following files, as appropriate. See the Repository Configuration Guide, and the Application Configuration Guide.
| Code Block | ||
|---|---|---|
| ||
/opt/eaglei/conf/eagle-i-apps.properties
/opt/eaglei/conf/eagle-i-apps-credentials.properties
/opt/eaglei/conf/whoami.xml
/opt/eaglei/conf/repo/configuration.properties
/opt/eaglei/conf/sparqler/configuration.properties
|
2. Restore a backup
Your eagle-i node is set to back up its repository data every day. The backups are located in /opt/eaglei/repo/backup/. To restore a backup, use the move-everything.sh script located in /opt/eaglei/repo/etc. For more information, see the Repository Installation, Upgrade and Administration Guide.
Deleting an EC2 instance and its resources
It is very easy to delete EC2 instances that are used for evaluation or as development environments and create new ones, so experimentation is encouraged. Please note that when you no longer need an EC2 instance, you need to delete all its associated resources (which incur charges individually, even if they are not attached to an instance). The easiest way to do so is as follows:
- Open your Cloud Formation Dashboard, check the box on the left of your stack and click the button Delete stack.
- When the stack has finished deleting (refresh to see the status), open your EC2 Dashboard, open the Elastic Block Store section in the left navigation bar and select Volumes. You should see a 50 GB volume; check the box on the left, click on the Actions button and select Delete volume.
- Delete your elastic IP address and key pair in a similar fashion.
- Note that if you are deleting an instance and will be creating a new one, you may reuse the elastic IP address and key pair that you have already allocated.
Appendices
...
1. Starting an SSH session with your EC2 instance
For both methods, use as server name your public hostname (or your elastic IP address, if the hostname is not working) and as username root.
1.1. With a terminal (Linux, MacOS or Windows cygwin)
1.1.1. First time only: set the correct permissions for your SSH key
The ssh command will not accept a key that has broad file system permissions. Open a terminal and change to the directory where you've stored the key, e.g.:
| Code Block | ||
|---|---|---|
| ||
cd /my-home/aws/keys
|
Issue the following command to set the correct permissions:
| Code Block | ||
|---|---|---|
| ||
chmod 700 .
chmod 600 *
|
1.1.2. SSH into your EC2 instance
Issue the ssh command, specifying the root user, for example: (you will need to substitute the full path of your key and the public hostname of your instance)
| Code Block | ||
|---|---|---|
| ||
ssh -i /my-home/aws/keys/eagle-i-key.pem root@eagle-i.miskatonic.edu
|
At this point you have a remote terminal session with your EC2 instance.
| Tip |
|---|
See also this guide at AWS documentation central: Connecting to Linux/UNIX Instances Using SSH |
1.2. With Windows PuTTY
| Tip |
|---|
Follow this guide at AWS documentation central: Connecting to Linux/UNIX Instances from Windows Using PuTTY. In the connection window, enter your public hostname (either the amazon-provided or that which you mapped to your elastic IP address) and when prompted for a user, use |
2. Specifications of the EC2 stack created
2.1. Virtual hardware and resources
- EC2 medium or large standard instance
- 20 GB EBS volume for the root partition (with 8 GB of swap)
- 50 GB EBS volume for
/opt/eaglei - one elastic IP address
- one key pair
2.2. Software
- CentOS 6.4
- Ansible 1.1
- JRE 1.7.0_17
- Tomcat 7.0.37
- Postfix
- eagle-i software 2.0-MS2.17
2.3. Configuration
- Daily scheduled task (i.e. cron) to backup the eagle-i repository - runs at 1 AM
- Daily scheduled task to generate sitemap - runs at 2 AM
6. Verifying eagle-i node
Status title evaluation/development node - Go to your EC2 Dashboard.
- Click on 'Running Instances'
- Make note of the Public DNS in the description, this will be your hostname for the rest of the instructions.
Status colour Blue title production node
Troubleshooting
Getting a time out error when trying to navigate to the application in a browser
...
5. Production instance only
There are additional steps that need to happen in order to make your instance production ready. For more information about elastic IP address, please see the Amazon Documentation: Elastic IP Addresses.
- Allocate an elastic IP address
- Associate the elastic IP to your public hostname
- Install your SSL Certificate
