Page History
Introduction
This document details the procedure for creating an eagle-i institutional node as a virtual server (or instance) in the Amazon Elastic Compute Cloud (or EC2). Once created, the eagle-i node will operate entirely in the cloud. However, you will retain administrative responsibility over its operation and maintenance, and in particular, you will be responsible for running upgrade scripts when new eagle-i software is released. We do not expect these tasks to be complex, though basic Unix skills are desirable. This solution is ideal for institutions that want to evaluate eagle-i or participate in the eagle-i network but do not have easy access to a data center service. Naturally, the AWS service will incur operational costs (for pricing details, consult the AWS website).
The installation procedure is simple and does not require specialized technical skills. It will allow you to get an eagle-i node up and running in a short amount of time. For a production system, you may need to involve your IT department, in a limited way.
| Panel |
|---|
What this is: an automated mechanism for instantiating an eagle-i node in the Amazon Cloud |
1. Getting ready
| Tip |
|---|
Throughout this procedure, you will be using the AWS Management Console, and in particular the EC2 Dashboard and the Cloud Formation Dashboard. You may want to familiarize yourself with the console and bookmark it: https://console.aws.amazon.com |
This procedure can be used to create an evaluation/development or a production eagle-i node:
- An
requires less configuration, but it should not be used for collecting actual data; this type of node can be created and destroyed at will.Status title evaluation/development node - A
will likely need some (limited) involvement of your IT department, but will result in a node that is ready for real world data collection.Status colour Blue title production node
| Warning |
|---|
Note that an evaluation or development node cannot be converted to a production node. |
As a pre-prerequisite, you will need to decide which type of installation you will need, evaluation/development or production eagle-i node.
Prerequisites
| Info | ||||||
|---|---|---|---|---|---|---|
You may need to involve your IT department to obtain the first 2 prerequisites for a |
Public host name
Anchor publicHostname publicHostname
may use the amazon-generated public hostnameStatus title evaluation/development node
will need to have a DNS record once you obtain an IP address from EC2Status colour Blue title production node - Decide on a good host name. It will determine the namespace of your Linked Open Data, and it shouldn't be changed once data exists in production.
- Examples of existing host names: harvard.eagle-i.net, eagle-i.ea.vanderbilt.edu
- An SSL Certificate
may use the self-signed certificate provided by the AMIStatus title evaluation/development node
needs an X509 certificate in PEM formatStatus colour Blue title production node
- A browser (in our experience Firefox works best; in Chrome, the scrollbars in AWS dialogues are finicky)
- An Amazon Web Services (AWS) account with the Amazon Elastic Compute Cloud (EC2) service enabled
- Sign up for AWS
- Sign up for the EC2 service; this will require that you provide credit card information.
- An SSH client for remotely logging in to the EC2 instance
- If you're using Linux, you know what this is about already
- In MacOSX you can simply use the Terminal application that is installed by default (look in your Applications folder, under Utilities)
- In Windows we recommend downloading and installing PuTTY (a remote login client that can handle SSH keys) or cygwin (a full Unix toolset)
2. Installation Procedures
23. Customize eagle-i node
| Tip | ||
|---|---|---|
| ||
For an evaluation node, there is no need to customize the installation any further. Using the public DNS as your hostname, you may now go to a browser and navigate to the eagle-i node to begin entering data, searching data, accessing the repository, etc. See verify the eagle-i node is up and running for more information on where to navigate to. |
- Prepare to Customize eagle-i Node
- Customize eagle-i Repository
- Create system users
- Customize public SPARQL endpoint
- Update node configuration file
4. Verify installation
If you are running an| Status | ||
|---|---|---|
|
Customize eagle-i node
| title | Evaluation Node |
|---|
4. Production instance only
There are additional steps that need to happen in order to make your instance production ready. For more information about elastic IP address, please see the Amazon Documentation: Elastic IP Addresses.
- Allocate an elastic IP address
- Associate the elastic IP to your public hostname
- Install your SSL Certificate
1. Allocate EC2 Resources
| Note |
|---|
Please note that all the EC2 resources described below need to be allocated in the same availability zone |
1.1 Select a US availability zone/geographic region
Amazon allocates EC2 resources (IP addresses, virtual hardware) in specific facilities that are meant to cover different geographic regions (also called availability zones). We support three zones: US East (N. Virginia), US West (Oregon) and US West (N. California).
- Go to your EC2 Dashboard
- Using the pull down list at the top right hand corner of the dashboard (next to your user name); choose that which is most appropriate to your institution's location.

For more detailed information on creating and using a key pair with your EC2 instances, please see AWS Documentation: EC2 Key Pairs
- Go to your EC2 Dashboard.
- In the left navigation bar, open the Network and Security section.
- Select Key Pairs.
- Click on the Create Key Pair button.
- Enter a name for your key pair (e.g. eagle-i-key) and select create.
- Your private key will be downloaded to your computer, as a file with the name you specified and the
.pemextension (you may be prompted by your browser to select a location). Store it in a dedicated directory to which you will come back later, e.g./my-home/aws/keys

2. Create an eagle-i node
2.1 Launch Instance of the eagle-i AMI
For more detailed information on how to launch an EC2 Instance from an AMI, please see AWS Documentation: Launching an Instance.
- Go to your EC2 Dashboard.
- Click on the Launch Instance button
- Select the Community AMIs tab on the left
- Search for 'eaglei'
Select the latest eagle-i AMI
Panel borderColor Grey title Latest eagle-i AMI eaglei-4.3.0-20160605 - ami-39e81654Root device type: ebs Virtualization type: hvmChoose an Instance Type that is appropriate for your installation. For the available instance types as of August 2016, we recommend:
t2.microStatus title evaluation/development node
m3.mediumStatus colour Blue title production node
- Click on the Review and Launch button
- Click on Edit Security groups
- Click on the Add Rule button
- Select HTTPS from the drop down
- Click on the Review and Launch button
- Click on the Launch button
- Select the key pair that was created in 1.2
- Click on the Launch Instance button
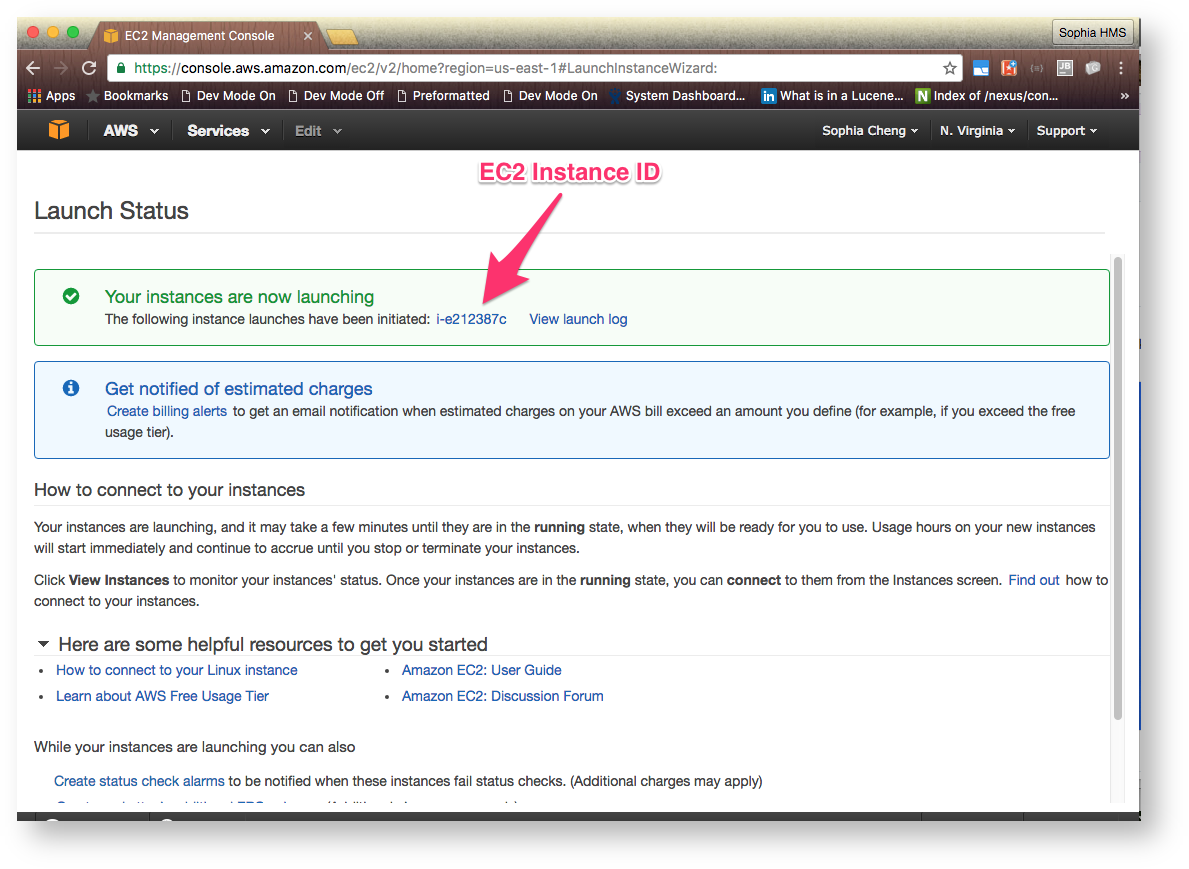
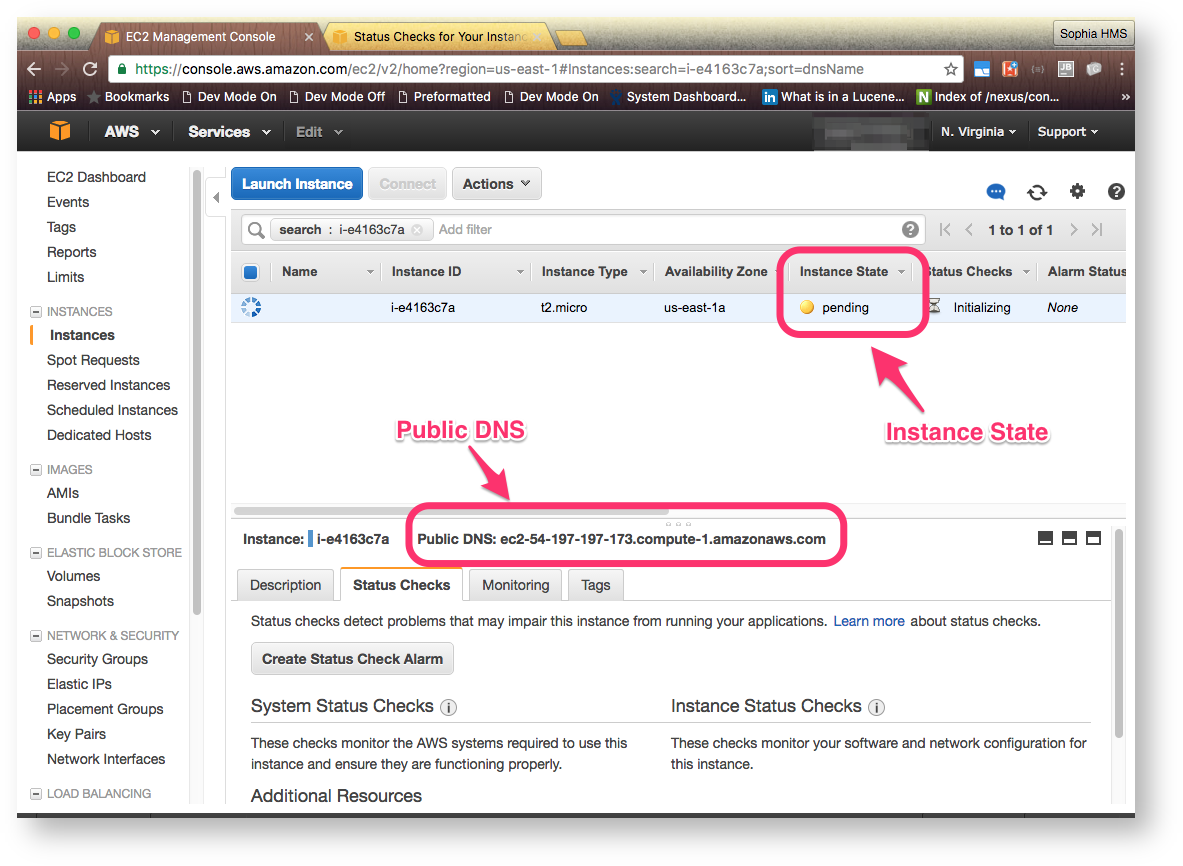
2.2 Wait for Instance to complete initialization
For more detailed information about the instance lifecycle, please see AWS Documentation: EC2 Instance Lifecycle.
- Click on the EC2 Instance ID in the Launch Status page
- Go to your EC2 Dashboard and click on Running Instances
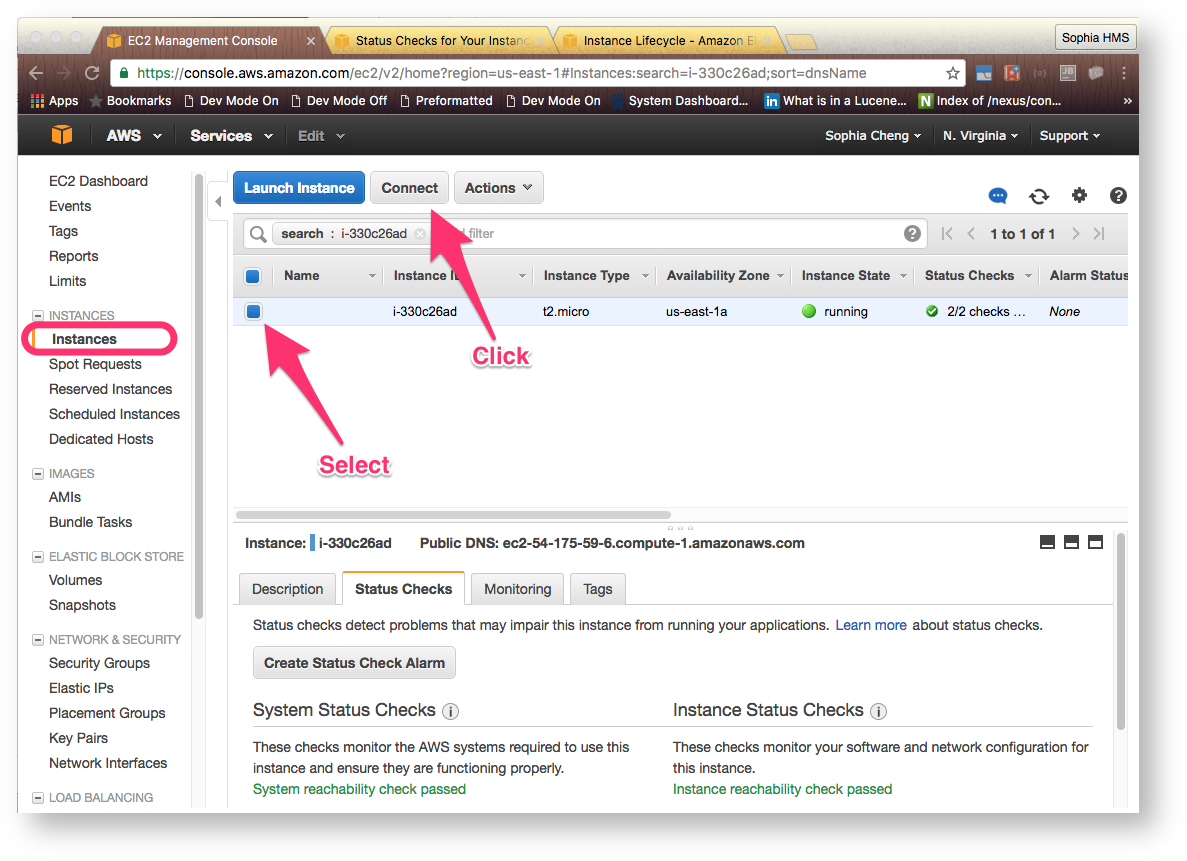
1. Prepare to customize eagle-i node
1.1 Connect to the eagle-i node
- Go to your EC2 Dashboard.
- Click on Running Instances
- Select the newly created EC2 Instance
- Click on the Connect button and follow the instructions to SSH to the node
1.2 Set required environment variables
In the SSH terminal:
Set the environment variable REPO_HOME to point to the repository home directory
export REPO_HOME=/opt/eaglei/repo
Set the environment variable SPARQLER_HOME to point to the SPARQLer home directory
export SPARQLER_HOME=/opt/eaglei/sparqler
- Verify the variables have been set correctly
echo ${REPO_HOME}echo ${SPARQLER_HOME}
Code Block language bash theme Emacs title Set environment variables linenumbers true [root@ip-172-31-54-208 repo]# export REPO_HOME=/opt/eaglei/repo/ [root@ip-172-31-54-208 repo]# export SPARQLER_HOME=/opt/eaglei/sparqler/ [root@ip-172-31-54-208 repo]# echo ${REPO_HOME} /opt/eaglei/repo/ [root@ip-172-31-54-208 repo]# echo ${SPARQLER_HOME} /opt/eaglei/sparqler/
2. Customize repository
The following assumes that you are in the SSH terminal connected to your ec2 instance.
2.1 Stop the running tomcat instance
Go to the tomcat directory
cd /opt/apache-tomcat-7.0.39/
Stop tomcat using the shutdown wrapper script
sudo -su tomcat bin/shutdownwrapper.sh
Verify tomcat has been shutdown
ps aux | grep tomcat
| language | bash |
|---|---|
| theme | Emacs |
| title | Shutdown tomcat |
| linenumbers | true |
2.2 Modify configuration.properties for the repository
cd ${REPO_HOME}
vim configuration.properties
eaglei.repository.namespace
eaglei.repository.titleeaglei.repository.logo
| Code Block | ||||||||
|---|---|---|---|---|---|---|---|---|
| ||||||||
[root@ip-172-31-54-208 ~]# cd ${REPO_HOME}
[root@ip-172-31-54-208 repo]# vim configuration.properties

##### configuration.properties file ####
eaglei.repository.namespace = http://ec2-54-175-59-6.compute-1.amazonaws.com/i/
eaglei.repository.title = AMI Test Repository
eaglei.repository.logo = https://alaska.qa.eagle-i.net:8443/sweet/images/eaglei-medium-blue.png |
2.3 Prepare the repository for customization
- Go to the repository home directory
cd ${REPO_HOME}
- Delete the existing derby database
rm -fr db/
- Run the prepare-install script in the etc directory. Replace
REPOADMINandREPOADMINPWwith the credentials for the repository administrator.bash etc/prepare-install.sh REPOADMIN REPOADMINPW ${REPO_HOME}
Modify the ownership of the derby database to be owned by the tomcat user
chown -R tomcat:tomcat db/
Code Block language bash theme Emacs title Prepare repository linenumbers true
2.4 Start tomcat
Go to the tomcat directory
cd /opt/apache-tomcat-7.0.39/
Start tomcat using the startup wrapper script
sudo -su tomcat bin/startupwrapper.sh
Wait for tomcat to finish startup.
Code Block language bash theme Emacs title Start tomcat linenumbers true [root@ip-172-31-54-208 opt]# cd apache-tomcat-7.0.39/ [root@ip-172-31-54-208 apache-tomcat-7.0.39]# sudo -su tomcat bash bin/startupwrapper.sh Waiting for Tomcat to startup ... Tomcat startup finished in ~120 seconds
5
Finish the repository customizationcd ${REPO_HOME}
.
ReplaceREPOADMIN and REPOADMINPW with the credentials for the repository administrator.bash etc/finish-install.sh REPOADMIN REPOADMINPW repository-url-prefix
Run the upgrade script in the etc directory. Replace REPOADMIN and REPOADMINPW with the credentials for the repository administrator.
bash etc/upgrade.sh REPOADMIN REPOADMINPW repository-url-prefix
| Code Block | ||||||||
|---|---|---|---|---|---|---|---|---|
| ||||||||
[root@ip-172-31-54-208 sparqler]# cd ${REPO_HOME}
[root@ip-172-31-54-208 repo]# bash etc/finish-install.sh ami-admin-user ami-admin-pw https://ec2-54-175-59-6.compute-1.amazonaws.com
User metadata created.
Updating data model ontology from jar, please wait...
Updated data model ontology from jar.
[root@ip-172-31-54-208 repo]# bash etc/upgrade.sh ami-admin-user ami-admin-pw https://ec2-54-175-59-6.compute-1.amazonaws.com

***** Checking and Upgrading Repository's Internal Graphs

INFO: Skipping, internal graph is already up to date: http://eagle-i.org/ont/repo/1.0/
INFO: Skipping, internal graph is already up to date: http://eagle-i.org/ont/repo/1.0/NG_Query


.....lots of output and stuff here .....

OK - specials all succeeded.
rm -rf /tmp/repo-upgrade-9784 |
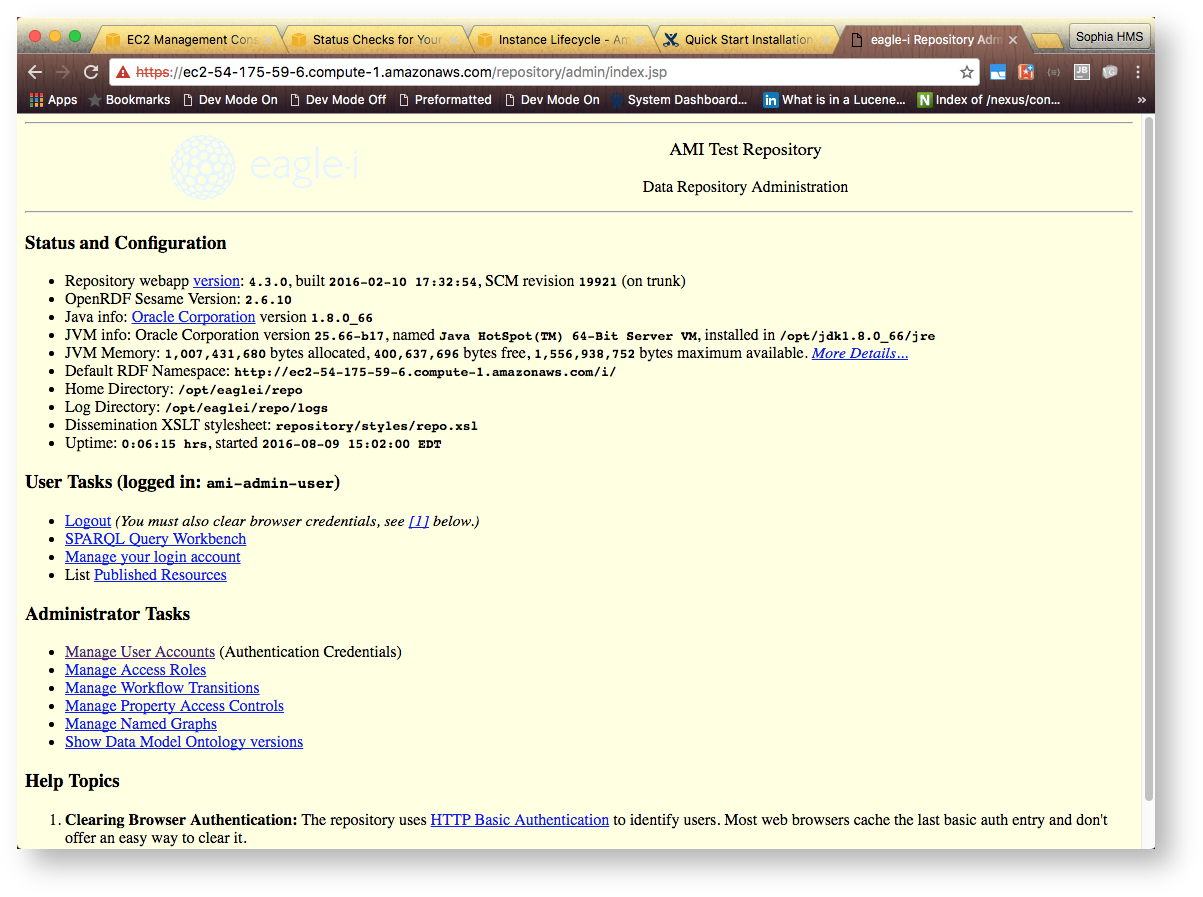
2.6 Verify repository has been customized correctly
In a browser, navigate to the repository admin console and log in using the repository administrator credentials.
3. Create and configure additional system users
3.1 Create the additional system users
Additional system users are needed for several automated processes. The following users need to be created:
- Global user. This is an automated agent responsible for keeping the cached copy of commonly used resources up to date with the Commonly Used Resources' repository. This agent caches only the minimal information needed for the SWEET application.
- Role: Automated Agent
- Corresponding properties:
eaglei.datatools.globals.user & eaglei.datatools.globals.password
- Anonymous user. This agent is responsible for retrieving published information for using the profiles integration and for the resource listings on the institution (node) home page.
- Role:none
- Corresponding properties:
eaglei.anonymousExtended.user & eaglei.anonymousExtended.password
3.2 Add the additional system users to the properties file
In the SSH terminal:
- Go to the eagle-i configuration directory
- cd /opt/eaglei/conf/
- Open the eagle-i-apps-credentials.properties file in the text editor of your choice.
- Add the credentials for the two system user mentioned above to the file
- Save your changes.
| Code Block | ||||||||
|---|---|---|---|---|---|---|---|---|
| ||||||||
[root@ip-172-31-54-208 sparqler]# cd /opt/eaglei/conf/
[root@ip-172-31-54-208 conf]# vim eagle-i-apps-credentials.properties

##### eagle-i-apps-credentials.properties file ####
# GLOBAL SERVICE
eaglei.datatools.globals.user=dtgu
eaglei.datatools.globals.password=dtgp

# Catalyst service
eaglei.anonymousExtended.user=eaeu
eaglei.anonymousExtended.password=eaep |
4. Customize public sparql endpoint
The following assumes that you are in the SSH terminal connected to your ec2 instance.
4.1 Stop the running tomcat instance
Go to the tomcat directory
cd /opt/apache-tomcat-7.0.39/
Stop tomcat using the shutdown wrapper script
sudo -su tomcat bin/shutdownwrapper.sh
Verify tomcat has been shutdown
ps aux | grep tomcat
| Code Block | ||||||||
|---|---|---|---|---|---|---|---|---|
| ||||||||
[root@ip-172-31-54-208 log]# cd /opt/apache-tomcat-7.0.39/
[root@ip-172-31-54-208 apache-tomcat-7.0.39]# sudo -su tomcat bin/shutdown.sh
Using CATALINA_BASE:   /opt/apache-tomcat-7.0.39
Using CATALINA_HOME:   /opt/apache-tomcat-7.0.39
Using CATALINA_TMPDIR: /opt/apache-tomcat-7.0.39/temp
Using JRE_HOME:        /opt/jdk1.8.0_66
Using CLASSPATH:       /opt/apache-tomcat-7.0.39/bin/bootstrap.jar:/opt/apache-tomcat-7.0.39/bin/tomcat-juli.jar
[root@ip-172-31-54-208 apache-tomcat-7.0.39]# ps aux | grep tomcat
root      1646  0.0  0.0 103312   876 pts/0    S+   13:02   0:00 grep tomcat

#### The following means that tomcat is still running ####
tomcat    1674 93.2 11.4 3599164 116800 pts/0  Sl   13:08   0:03 /opt/jdk1.8.0_66/bin/java -Djava.util.logging.config.file=/opt/apache-tomcat-7.0.39/conf/logging.properties
-Djava.util.logging.manager=org.apache.juli.ClassLoaderLogManager -Xmx1536m -XX:+PrintGCDetails
-Xloggc:/opt/apache-tomcat-7.0.39/logs/tomcat-gc.log -Djava.endorsed.dirs=/opt/apache-tomcat-7.0.39/endorsed
-classpath /opt/apache-tomcat-7.0.39/bin/bootstrap.jar:/opt/apache-tomcat-7.0.39/bin/tomcat-juli.jar
-Dcatalina.base=/opt/apache-tomcat-7.0.39 -Dcatalina.home=/opt/apache-tomcat-7.0.39
-Djava.io.tmpdir=/opt/apache-tomcat-7.0.39/temp org.apache.catalina.startup.Bootstrap start |
4.2 Modify configuration.properties for the public sparql endpoint
cd ${SPARQLER_HOME}
configuration.properties file in a text editor of your choicevim configuration.properties
eaglei.repository.namespace
eaglei.repository.titleeaglei.repository.logo
| Code Block | ||||||||
|---|---|---|---|---|---|---|---|---|
| ||||||||
[root@ip-172-31-54-208 ~]# cd ${SPARQLER_HOME}
[root@ip-172-31-54-208 sparqler]# vim configuration.properties

##### configuration.properties file ####
eaglei.repository.namespace = http://ec2-54-175-59-6.compute-1.amazonaws.com/i/
eaglei.repository.title = AMI Test Repository
eaglei.repository.logo = https://alaska.qa.eagle-i.net:8443/sweet/images/eaglei-medium-blue.png |
4.3 Prepare the public sparql repository for customization
- Go to the repository home directory
cd ${REPO_HOME}
- Run the prepare-install script in the etc directory. Replace
SPARQLADMINUSERandSPARQLADMINPWwith the credentials for the public sparqler repository administrator.bash etc/prepare-install.sh SPARQLADMINUSER SPARQLADMINPW ${REPO_HOME} sparqler-users.derby
Modify the ownership of the derby database to be owned by the tomcat user
chown -R tomcat:tomcat db/
Code Block language bash theme Emacs title Prepare repository linenumbers true [root@ip-172-31-54-208 sparqler]# cd ${REPO_HOME} [root@ip-172-31-54-208 repo]# bash etc/prepare-install.sh sparqler-user sparqler-pw ${REPO_HOME} sparqler-users.derby _RUNJAVA set to "/opt/jdk1.8.0_66/jre/bin/java" java version "1.8.0_66" Java(TM) SE Runtime Environment (build 1.8.0_66-b17) Java HotSpot(TM) 64-Bit Server VM (build 25.66-b17, mixed mode) ---all superuser logins--- sparqler-user [root@ip-172-31-54-208 repo]# chown -R tomcat:tomcat db/
4.4 Update eagle-i property files with public sparqler information
- Go to the eagle-i configuration directory
cd /opt/eaglei/conf/
- Using the text editor of your choice, edit the
eagle-i-apps.propertiesfile- v
im eagle-i-apps.properties
- v
- Add the following two properties to the
eagle-i-apps.propertiesfile to define the source and target repository for the public sparql endpoint:eaglei.sparqler.source.URL, this will be your main repository URLeaglei.sparqler.target.URL, this will be the URL of your public sparql endpoint. Typically it is a concatenation of the main repository URL with 'sparqler'
- Save your changes.
- Using the text editor of your choice, edit the
eagle-i-apps-credentials.propertiesfile. - Add the credentials used when running the prepare-install.sh script for the sparqler to the
eagle-i-apps-credentials.propertiesfile.eaglei.sparqler.target.usereaglei.sparqler.target.password
Save your changes
Code Block language bash theme Emacs title Update Sparqler configs linenumbers true [root@ip-172-31-54-208 sparqler]# cd /opt/eaglei/conf/ [root@ip-172-31-54-208 conf]# vim eagle-i-apps.properties ##### eagle-i-apps.properties file ##### ## SPARQLER ### URL of source-repository (from which the sparqler reads public information): eaglei.sparqler.source.URL = https://ec2-54-175-59-6.compute-1.amazonaws.com/ ### URL of target (i.e., sparqler) repository: eaglei.sparqler.target.URL = https://ec2-54-175-59-6.compute-1.amazonaws.com/sparqler/ ######################################## [root@ip-172-31-54-208 conf]# vim eagle-i-apps-credentials.properties ##### eagle-i-apps-credentials.properties file ##### eaglei.sparqler.target.user=sparqler-user eaglei.sparqler.target.password=sparqler-password ####################################################
4.5 Start tomcat
Go to the tomcat directory
cd /opt/apache-tomcat-7.0.39/
Start tomcat using the startup wrapper script
sudo -su tomcat bin/startupwrapper.sh
Wait for tomcat to finish startup.
Code Block language bash theme Emacs title Start tomcat linenumbers true [root@ip-172-31-54-208 opt]# cd apache-tomcat-7.0.39/ [root@ip-172-31-54-208 apache-tomcat-7.0.39]# sudo -su tomcat bash bin/startupwrapper.sh Waiting for Tomcat to startup ... Tomcat startup finished in ~115 seconds
4.6 Finish the public sparql repository customization
- Go to the repository home directory
cd ${REPO_HOME}
- Run the finish install script in the etc directory. Replace
SPARQLADMINUSERandSPARQLADMINPWwith the credentials for the public sparqler repository administrator.bash etc/finish-install.shSPARQLADMINUSERSPARQLADMINPWsparqler-repository-url-prefix
Code Block language bash theme Emacs title Finish repo linenumbers true [root@ip-172-31-54-208 sparqler]# cd ${REPO_HOME} [root@ip-172-31-54-208 repo]# bash etc/finish-install.sh sparqler-user sparqler-pw https://ec2-54-175-59-6.compute-1.amazonaws.com/sparqler User metadata created. Updating data model ontology from jar, please wait... Updated data model ontology from jar
4.7 Verify the public sparql endpoint has been customized correctly
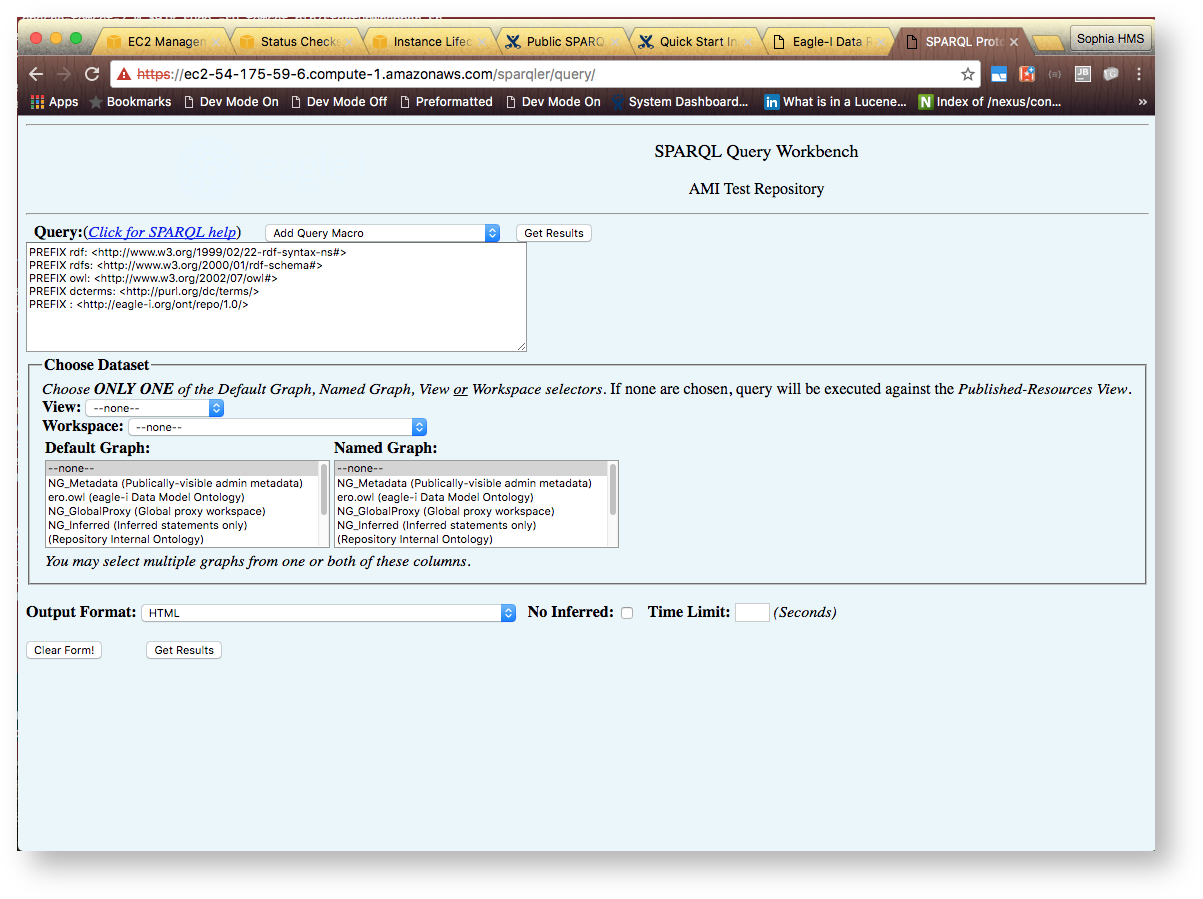
In a browser, navigate to the public sparql endpoint admin console and log in using the public sparqler repository administrator credentials.
5. Update the local-node.xml file
The local-node.xml file provides information to the applications about the node. In the SSH terminal:
Production instance only
There are additional steps that need to happen in order to make your instance production ready. For more information about elastic IP address, please see the Amazon Documentation: Elastic IP Addresses.
1.3.
Troubleshooting
Getting a time out error when trying to navigate to the application in a browser
Double check your security groups and make sure that inbound traffic on HTTPS is allowed.
Error when running finish-install.sh : FAILED to create metadata for user, HTTP status=302
The repository url must match exactly. Typically this happens when http is typed instead of https.
Overview
Content Tools